In 2021, Amazon Pay-per-Click Advertising (PPC) and how it works is basically essential know-how at this point for every aspiring e-Commerce entrepreneur.
According to Statista, Amazon already holds a 50% share in the US online retail market. Even if you aren’t an Amazon Seller, having a basic understanding of Amazon PPC campaign structure goes a long way in understanding your competition and how it works.
Amazon PPC advertising has exploded over the years. From just one ad type and one targeting option in 2012, now it has 3 main ad types and 2 types of targeting. A crash course in these three ad types will help you structure your campaigns better!
Sponsored Products
Starting with the most frequently used ad type, Sponsored Products are the ads you see on the Amazon search result page, also referred to as a SERP. For example, when you search “gym bottles” on Amazon, you get the following results:
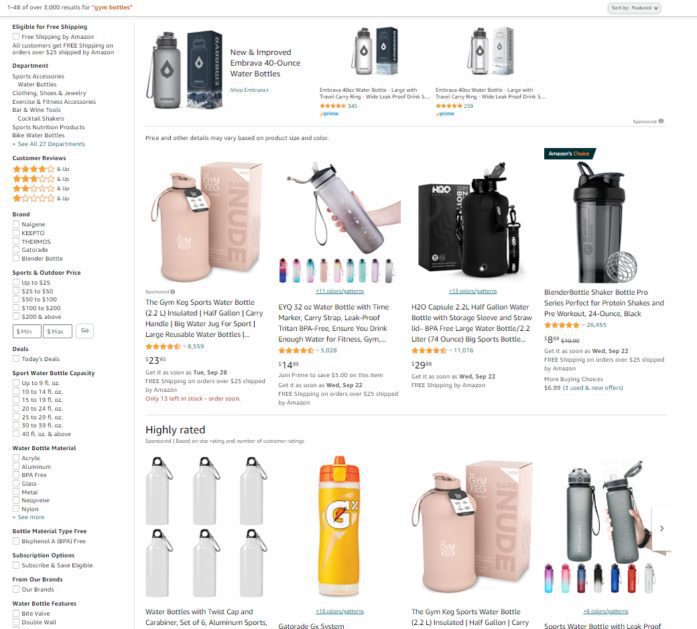
As you can see, the first four gym bottles have the “Sponsored” tag, which means they are a Sponsored Product ad. These ads are being run by the seller in question using Amazon PPC ad campaigns.
Ad Placements
There are four ad placements for Sponsored Product Ads:
- Top of search
- Middle of search
- Bottom of search
- Product detail pages
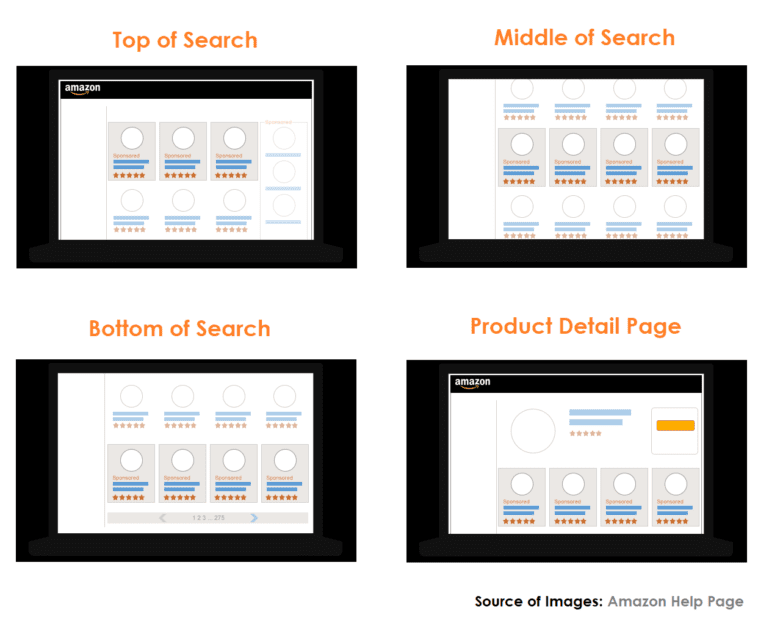
These placements are pretty much self-explanatory. Product detail page ad placements show up as an ad carousel near the bottom of the page when you click on a product. (We’ll talk about these more later!)
Top of Search is the one to target because the highest sales come from Sponsored Products at the top of the page. It’s a well-known statistic that over 60% of people don’t go past the first page of results. This is naturally also true for Amazon.
Targeting Types
Sponsored Product ads allow for 2 types of targeting: keywords and product targeting. What this means is that you can either target a “keyword” such as “gym bottles for men” and place your sponsored ads on that SERP, or you can also target a product ASIN, such as a competitor’s product.
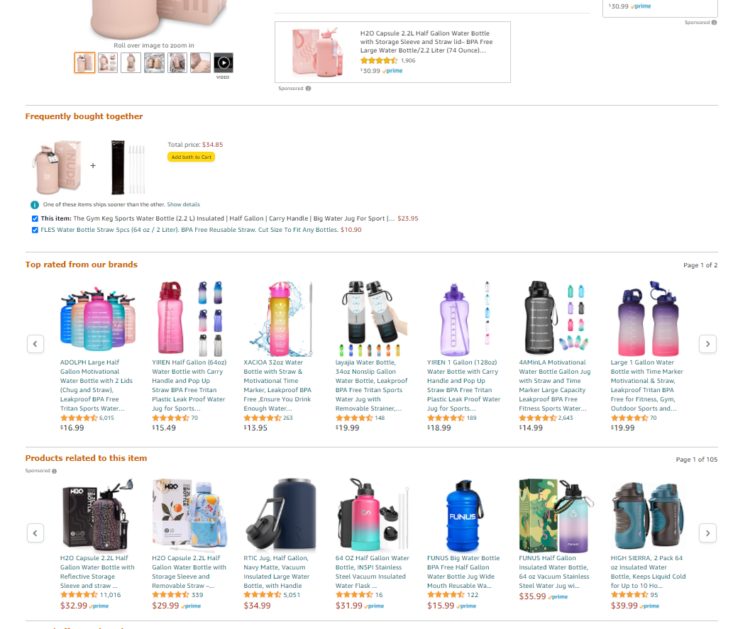
ASIN-targeted Sponsored ads will show up on the Product Detail Page in the ad carousel along the bottom. In the screenshot below the part along the bottom titled “Products related to this item” are actually ASIN-targeted sponsored ads.
Campaign Types
For Sponsored Products, you also have two targeting options: Automatic and manual. In order to differentiate these from the “Targeting types” we spoke of in the earlier section, we’ll be calling these “Campaign types”. Basically, there are two types of Sponsored Products campaigns, automatic campaigns, and manual campaigns.

Automatic campaigns are pretty much what they sound like. Amazon’s algorithm will find a set of keywords or products for you to target. Essentially, you’re surrendering the reigns to Amazon. Automatic campaigns can really eat into your budget if left unsupervised, but they are great for getting necessary keyword data.
Meanwhile, manual targeting is when you decide on every aspect of your Sponsored Products ad campaign. You’re the one putting in a set of keywords or product targets, and you are also deciding on the corresponding bids for each. Manual targeting is preferred by most sellers because it offers you the most control over your Amazon PPC campaign budget.
Sponsored Brands
Sponsored Brands ads, sometimes called Headline Search ads, are ads that show up as a banner at the very top of the SERP. To go back to our “gym bottles” search query, the grey bottle at the very top is a Sponsored Brand ad for Embrava gym bottles.

These ads are usually a store spotlight, and sometimes also show up vertically along the side of a page, though a “headline” banner is much more common.
Stores can add a maximum of 3 product images in a Sponsored brand ad, so usually, brands showcase 3 variations of a popular product rather than 3 different products they sell. When you click on a Sponsored Brand ad, you get redirected to product detail pages, custom landing pages, or a brand storefront.
Ad Placements
There are three areas of the results page where Sponsored brands can show up. The first which we already mentioned is the header at the very top of a SERP. Another is a vertical ad right on the sidebar where shoppers can add filters to their search queries. If you look closely, you can see the little “Sponsored” tag right along the bottom.
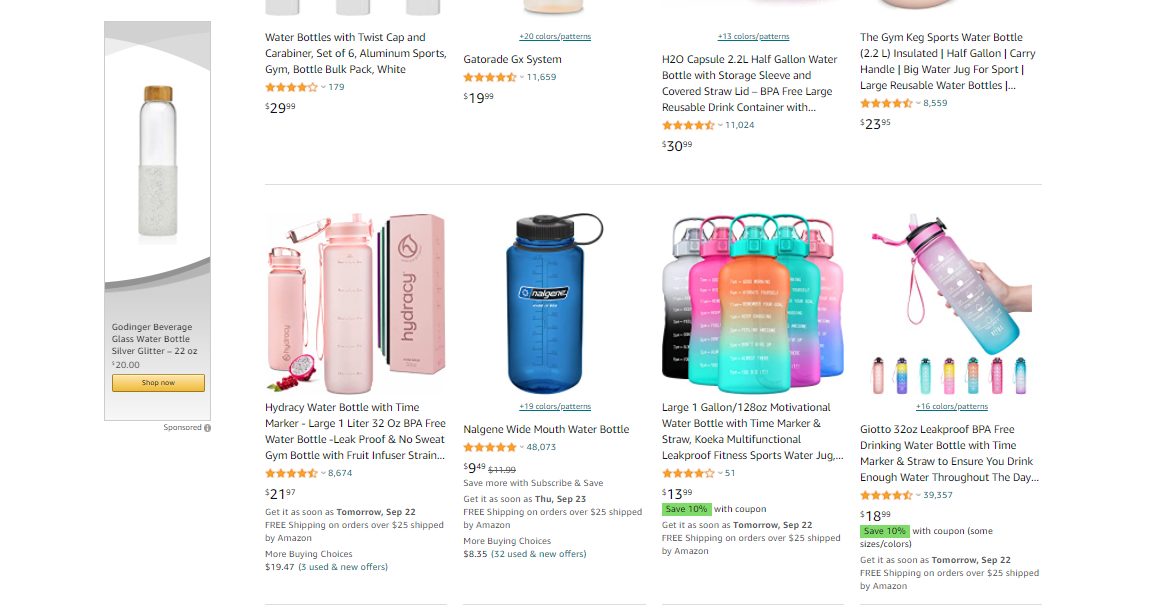
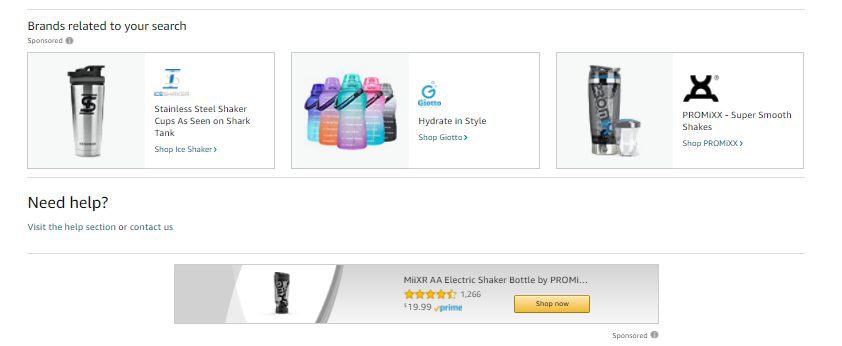
Sponsored Brand ads will also show up at the bottom of the SERP, under “Brands related to your search.” Here we can see the Sponsored Brands ads of three different stores. There’s another Sponsored brand ad right beneath for another storefront as well.
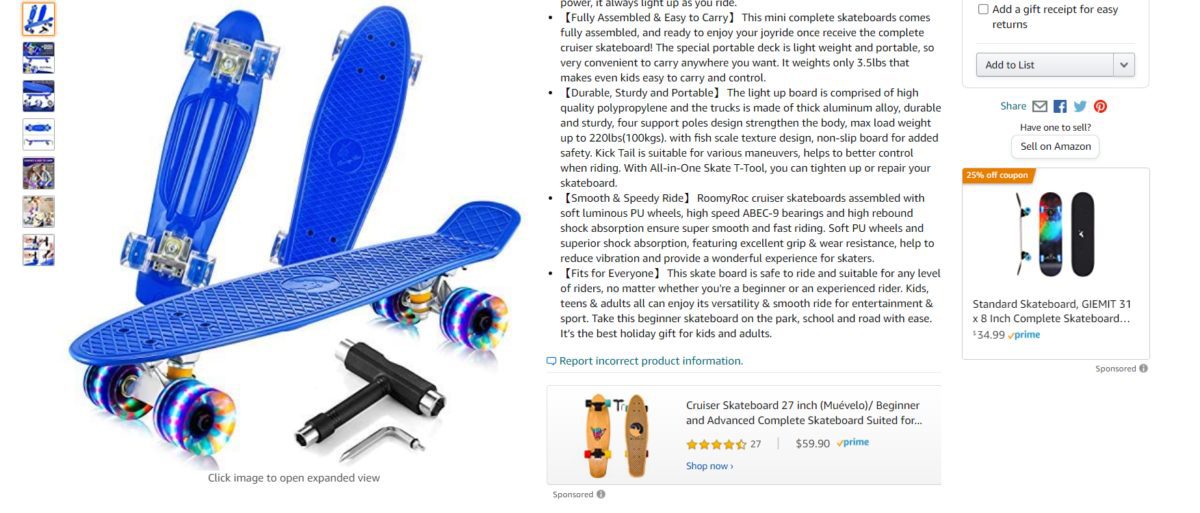
Sponsored Brands ads will also appear on Product detail pages, usually as a rectangle right beneath the product bullet points. Do not confuse this rectangle with the little box on the right! The box on the right side is a different type of ad we’ll mention in the next section…
Ad Formats
Sponsored Brands is unique. You actually get to choose between three different ad formats.
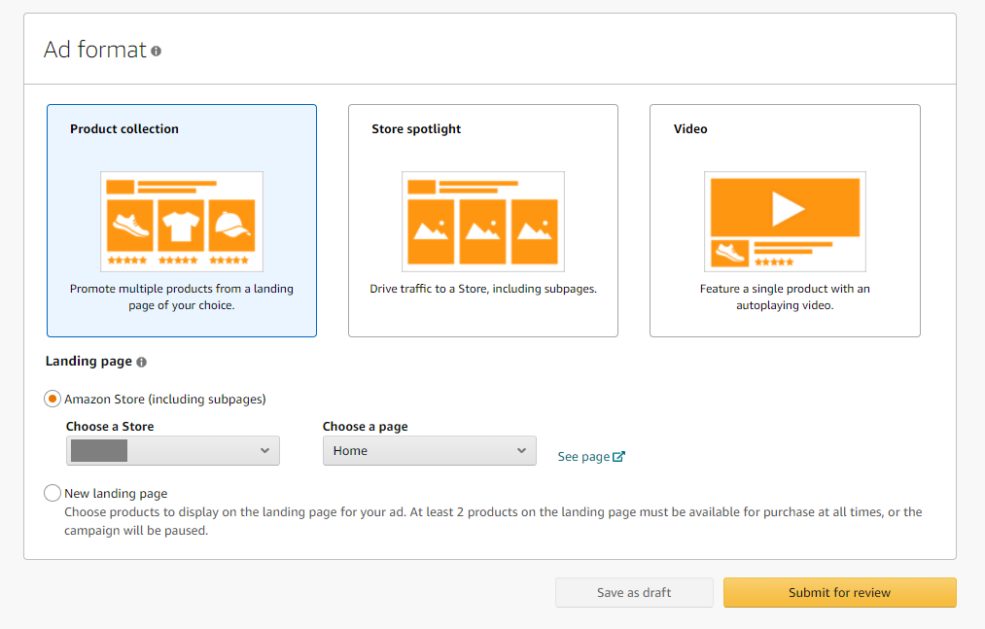
We already mentioned the Product Collection – showcasing three products at a time. Here’s a more simple example of a Sponsored Brands Product Collection ad for the search query “baby monitor.” You can see three types of baby monitors that Owlet is showcasing in their ad.

For Store Spotlight, these are really similar to Product Collection ads but they don’t really feature products, they feature the store itself. You will always see these along with the For Store Spotlight, these are really similar to Product Collection ads but they don’t really feature products, they feature the store itself. You will always see these along the bottom of the SERP like in the screenshot below, but sometimes they show up at the top, too.

Sponsored Brand videos (SBV) are the really special part of this ad type. You can choose the Video format and run an SBV campaign. By running SBV campaigns, you can advertise using a video. We can’t recommend this ad format enough. It’s incredibly good at driving sales.
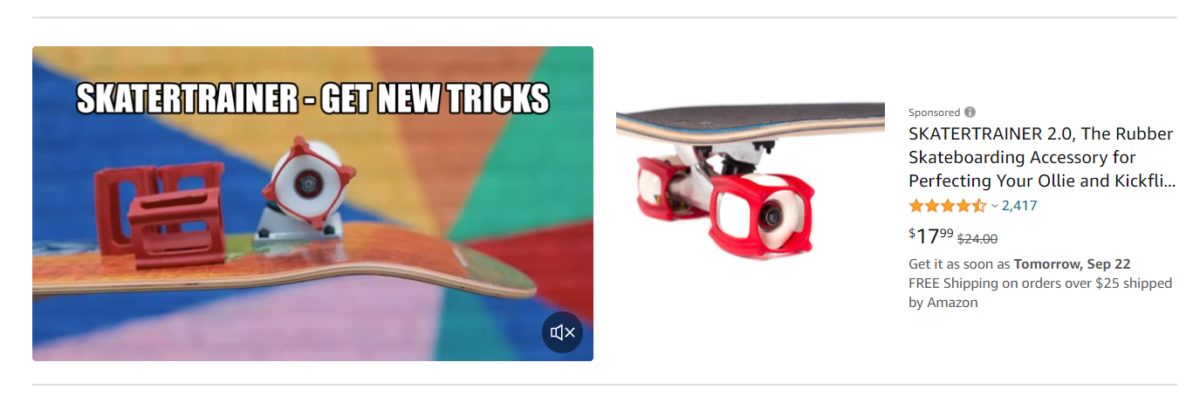
These videos show up smack in the middle of the page, so you really can’t miss them! For Sponsored Brand video, you can only advertise one product and the link will go to its product detail page, still, within the video you can show all manner of variations for it.
On Amazon, product videos are really powerful, they can double the click-through rate. Shoppers find products with videos to be more trustworthy, even for a simple video.
Targeting Types
Sponsored Brands has two targeting types like Sponsored Products, keyword, and product targeting. They function the same way as mentioned in the previous section. You can target a set of keywords or target competitor products.
Targeting competitor products will have your Sponsored Brands ads show up on product detail pages instead of search results pages.
Campaign Types
For Sponsored Brands, you don’t have two campaign types. You do get a list of suggested targets and bids from Amazon, but ultimately you have to add them all manually. There is not really any “automatic targeting” campaign, but there is the option of “Automated bidding.”
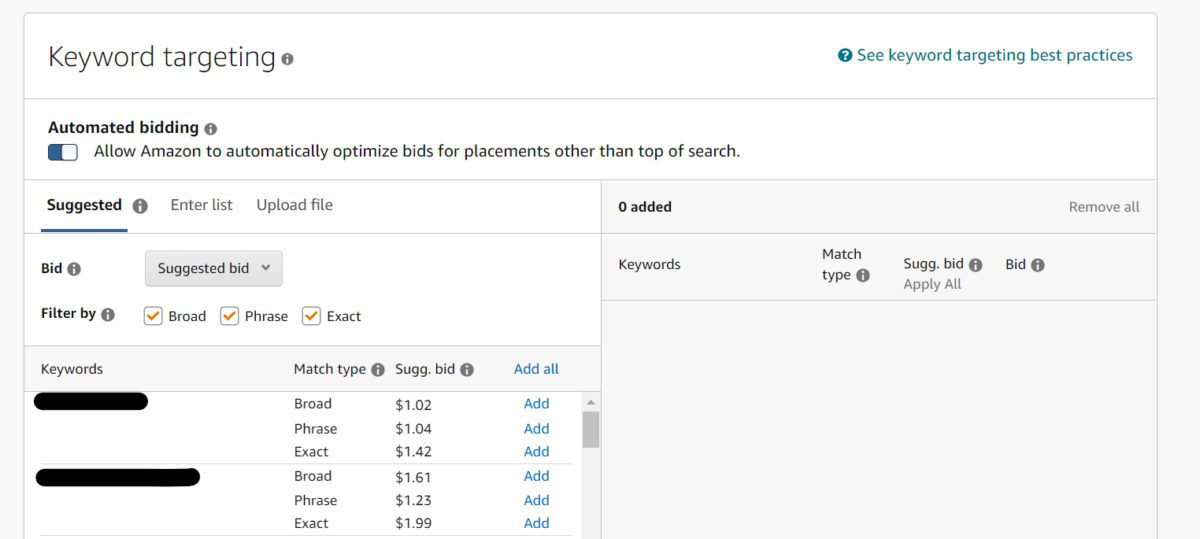
For automated bidding, Amazon will pretty much automatically optimize your bids for you, but only for placements that aren’t Top of Search. Ultimately, this feature isn’t as robust as an SP automatic campaign, but it will do if you aren’t sure how to optimize your bids. We highly recommend seeking resources or Amazon PPC software to help with this.
Sponsored Display
Finally, the very last ad type on Amazon is Sponsored Display. This is probably the youngest ad type, but it’s also gotten a lot of very nice new updates recently. Sponsored Display is much less customizable, but that doesn’t mean it’s not extremely robust.
Sponsored Display ads show up both on and off-Amazon, and the targeting options are very different to Sponsored Products and Sponsored Brands.
Ad Placements
Sponsored Display ads show up on the Product Detail pages. Remember that little square box on the right? That’s a Sponsored Display ad.
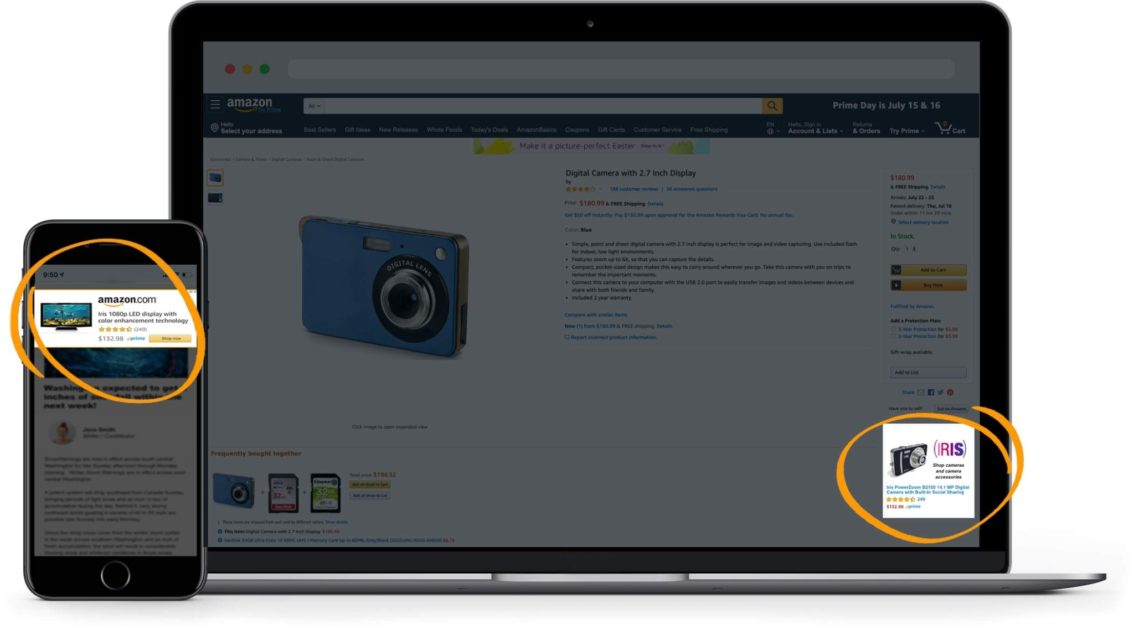
Image Source
The very cool thing about Sponsored Display ads is they will show up on sites other than Amazon. That’s right! You can get that sweet off-Amazon traffic to boost your sales. For example, in the screenshot below you can see an Amazon Sponsored Display ad showing up on an article.
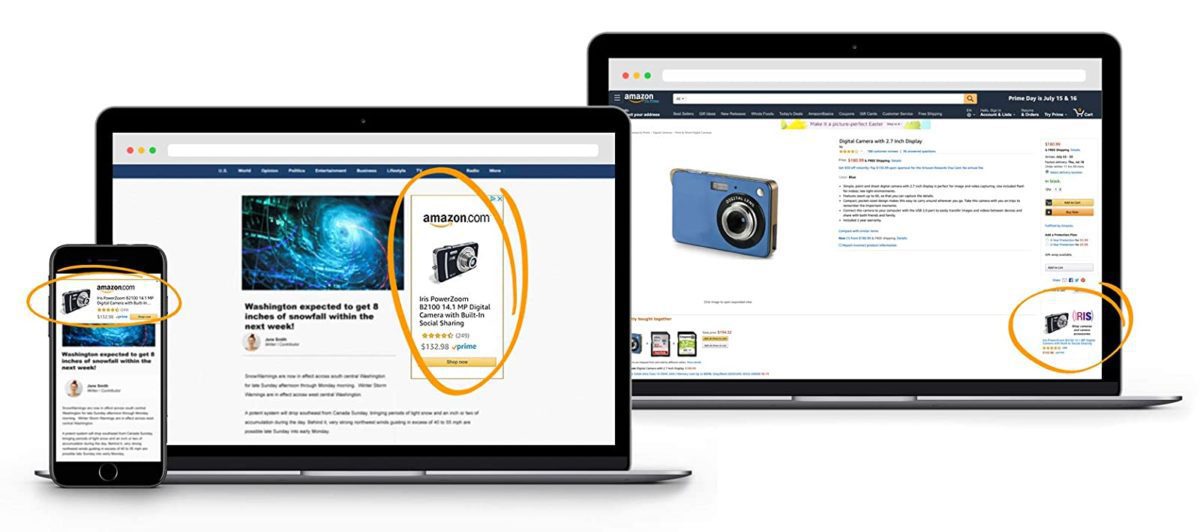
Image Source
Sponsored Display ad banners show only one product that you are advertising for, with the product image and ASIN. Clicking on it will take you directly to the Product Detail page for said ASIN.
Targeting Types
As mentioned before, Sponsored Display has two targeting options but different from Sponsored Products and Brands. You still have product targeting, but the other option you get now is “Audiences.” Product targeting is still a manual selection of products and bids, Audiences is where it starts to get very different.

First to cover the much simpler option of Product targeting. In product targeting, you’re simply targeting certain categories or a selection of products. You add these lists manually as seen below.
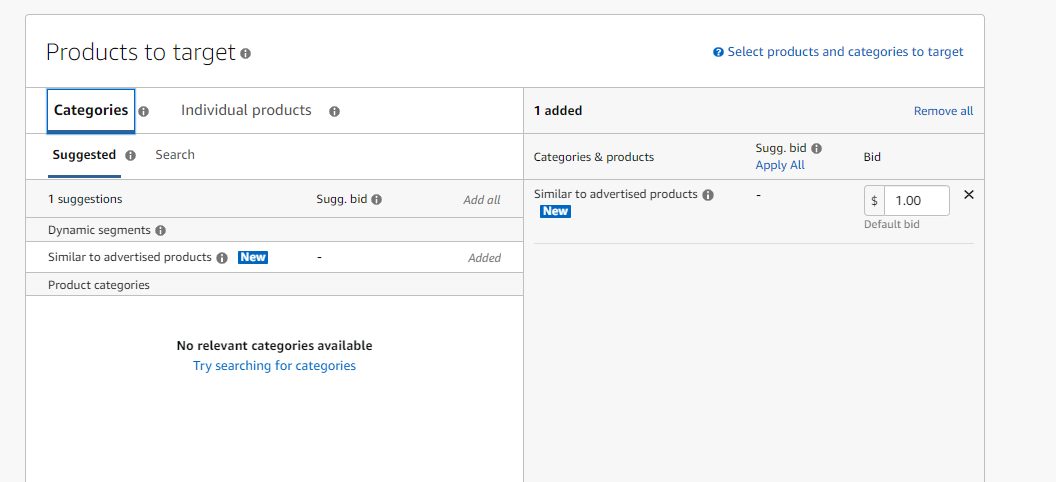
When you select Audiences, you get a selection of either “Views Remarketing” or “Amazon Audiences.”
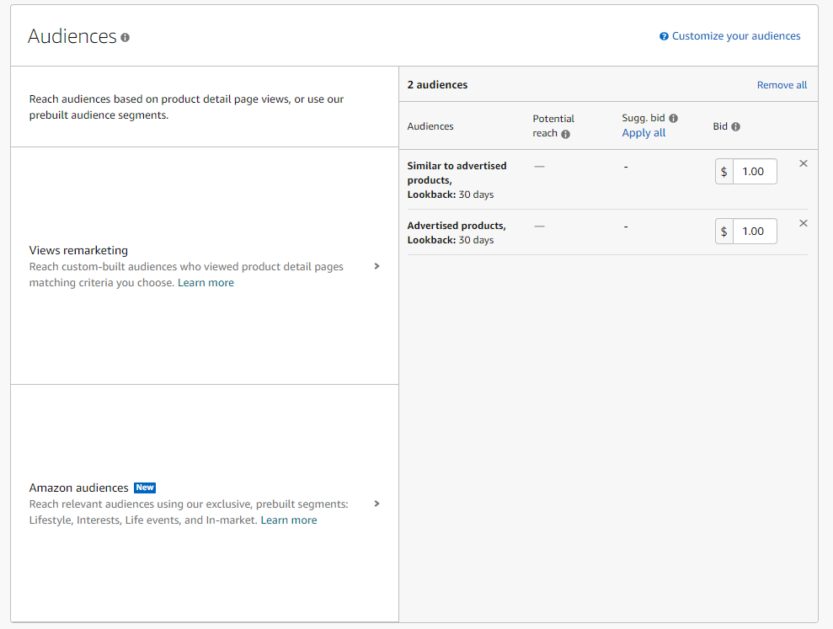
Views remarketing is essentially a way to re-target consumers who viewed your product detail pages or similar pages in the past 30 days. It is a simple look-back that’s much more automatic. We recommend running this campaign last because you need to build up a solid amount of traffic data for Amazon to re-target audiences that visited your product pages but did not purchase.
Meanwhile, Amazon audiences had a recent update that lets you really streamline what audiences you want to be targeting with your ads.
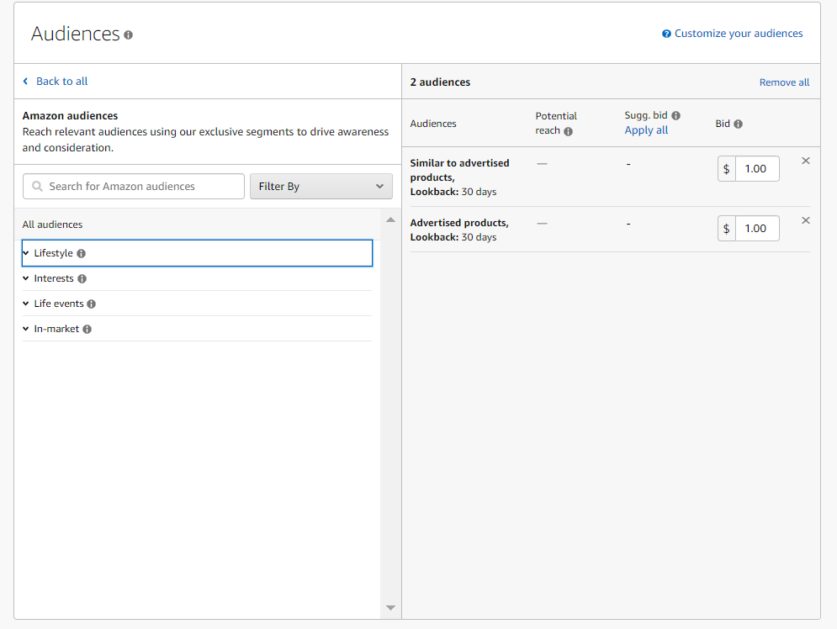
There are four categories under Amazon Audiences-
- Lifestyle
- Interests
- Life events
- In-market
When you click on one of these “audiences”, you get an even more extensive drop-down. Sponsored Display audiences in themselves would take an entire article to explain. For more information on how to narrow down your audiences, check out this guide to Amazon Sponsored Display ads audiences.
Campaign Types
Besides audiences, you can’t really customize campaign types for Sponsored Display at all. The most you can do is select certain types of bidding optimization strategies. In this way, Sponsored Display is not as versatile as Sponsored Products and even Sponsored Brands.
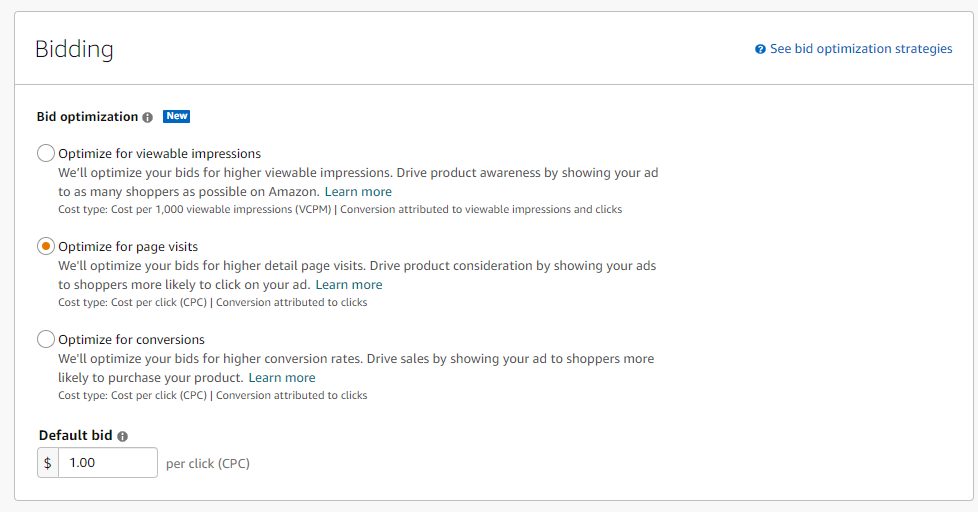
You also cannot know which off-traffic website your ads will be on. You can’t pick which ASINs or keywords they show up on unless you go with “Product targeting” and not “Audiences”. You cannot even manually change the bids, not even for “Product targeting”. You’re required to choose between the 3 bidding strategies provided.
Sponsored Display is much broader in its targeting, so bid customization isn’t quite a big issue at the moment. Still, we keep seeing constant, exciting new updates to Sponsored Display from Amazon, so more versatility and manual bidding may be in the cards yet!
The following structuring strategy is a template that is tailored for Sponsored Product campaigns. Since it’s the most popular ad type, we have made an incredibly detailed structuring plan for it. Other ad types will be touched upon in the next section.
Step 0. Naming Campaigns
An absolute necessity before you even do Step 1 is having a proper naming convention in place. The disorganized naming of campaigns will be your downfall in the future! Start at Step 0 and follow our foolproof naming convention:
{Ad Type} – {Campaign Type} – {Targeting Type}- {Product} – {Strategy}
For example, here’s are two properly named campaigns:
SP – Automatic – KW – B07XXXXXXX – Gym Bottle – Dynamic Bidding
SP – Manual – PAT – B05XXXXXXX – Skateboard – Product Launch for May
Step 1. Determine Ad Type
The first step is figuring out which ad type you need for a particular product. If you want to promote a single product at a time, Sponsored Products is your best bet. You can use SP ads for all categories excluding used, refurbished, or adult products. Sponsored Products allows you the most control over your keywords and targets out of all ad types.
If instead, you want to direct traffic towards your whole store or a particular product series, Sponsored Brands is the way to go. Well-designed headline banners can pull in a lot of traffic to your stores, and you can advertise multiple products simultaneously. Meanwhile, if you want off-Amazon traffic, or want to hit your competitors hard by showing ads on their Product Detail pages, then Sponsored Display is ideal.
Step 2. Automatic Campaign
Once you’ve figured out your ad type, you move on to the second step. Here, we will go with Sponsored Products because, as mentioned before, this structure is geared towards SP ad campaigns.
Start an automatic campaign. This is you letting Amazon do the grunt work of keyword research. You need to name the campaign, set a daily budget – we recommend at least $10-25 to start – and set campaign start and end dates. We recommend having it run at least a month, ideally more if your budget allows. Create your “Ad groups” and select the SKUs you want to advertise and then set a default bid for Amazon to use per target.
You can think of an automatic campaign as akin to putting your lasagne in the oven. You set those layers up, and then you let the oven do the cooking for you. Once you’ve filled out those fields, hit submit and your campaign is ready to roll. Amazon will pull in data for you for as long as you keep your SP automatic campaign running.
Step 3. Campaign Analysis Part 1
The third step is where the work begins. Once your SP automatic campaign has run its course, you need to sit down and analyze all the data Amazon collected for you.
Head over to Amazon Campaign Manager, click the sidebar and select “Reports.” Download the SP Search Term Report, and then pop it into Excel. Set the headers as filters, and filter by Campaign name, time period, and here’s the key step – sort by Conversion Rate%, from highest to lowest.
Why Conversion Rate (CVR) you ask? Because CVR is the ratio of orders to clicks and the best indicator of how well a keyword pulls in orders.
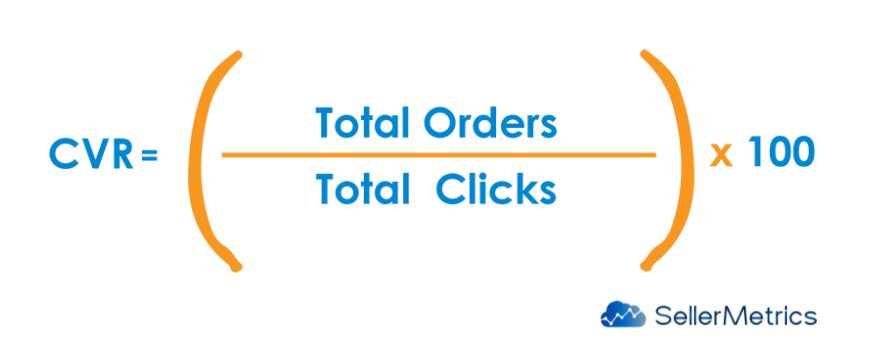
It’s not enough to simply look at Click Through Rate because so what if someone clicked on your ad! Did it lead to a sale? A keyword that only gets clicks is no good because it’s just going to add to your ad costs. You need the keywords that convert into sales.
Sort by CVR and find the top-performing keywords. We suggest setting the filter at CVR more than or equal to 10%, below that is not really worth it.
Step 4. Manual Campaign
Remember that list of top keywords? Now is when you use them. Step 4 is starting an SP manual campaign. You have the data; you analyzed it; you pulled out the best targets and so it’s time to take more control.
Create another SP campaign, but this time select “Manual targeting.” Fill out the same fields as before and select the SKUs you’re advertising. Click on the “Provide your own keywords” option and put in all your top keywords.
You’ll have CPC data from the SP automatic campaign you ran. You can use those CPCs as your baseline bids. Add on 10-20% to the CPC amount to bid aggressively on your top keywords. After setting it all up, just submit it and let it run for the next week.
Step 5. Campaign Analysis Part 2
After one week, you need to look at your Search Term Reports again. This time, you need to download the SP Search Term report for your SP manual campaign. We also really recommend keeping your SP automatic campaign running alongside to keep finding new keywords and consistently analyzing new data for insights.
Pop your SP Search Term Report into Excel again, and this time look at another metric – ACoS.

ACoS, or Advertising Cost of Sale, is where you can see if you’re losing money or earning money. Your ACoS should be low, and anything above 60% is a red flag. Sort your keywords by ACoS, and for those with low ACoS, bump up your bids to rank even higher on them. For high ACoS keywords, lower down to the CPC and give them a little more time before you decide to remove them altogether.
Step 6. Constant Optimization
The last step of every Amazon PPC campaign strategy is to constantly optimize your existing campaigns. Unfortunately, you can’t just let your campaigns sit there and expect them to work well, for that, you need bidding automation software. You need to keep downloading those reports, keep coming up with new keywords, keep optimizing your bids.
Amazon PPC campaigns are a labor of love. They are time-intensive, but the results are so, so worth it if you really put the work in. Running your SP campaigns well, and following the structure that gets you a good manual campaign at the end, is what gets you to Top of Search. Top of Search is your ticket to 7 figure sales. Make sure you always have that goal in mind when running Amazon PPC ad campaigns!
Structuring a Sponsored Brands and Sponsored Display campaign will definitely be a little different, but the fundamental structuring strategy remains the same.
Sponsored Brands
Luckily, your Sponsored Products automatic campaigns come in handy. When you think about it, you’re still trying to rank for the same keywords just with a different type of ad. You can use your SP automatic campaign data to find an excellent set of keywords for your Sponsored Brands campaigns.
Wait! Don’t take this as permission to just employ the same strategy for Sponsored Brand as you did for Sponsored Products. They are still two different ad types and you can’t mindlessly employ the same structure as the previous section.
The first fork in your decision tree is to adjust your budget. Sponsored Brand ads are used to expand your entire brand. You’re advertising your store and not just a product. You need to allocate a higher budget, ideally at least 50% of your total SP campaign budget to start with.
Run your SB campaign for 30 days, not a week, because the data acquisition will take longer. After 30 days, download SB Search term reports and consistently optimize your keywords and bids once again. SB and SP campaigns, when structured correctly, have a symbiotic relationship, one will feed into the other. Your SB campaigns will give your SP sales a jump too, so don’t skimp on your SB campaign budget!
Sponsored Display
Sponsored Display is where you really have to leave most of it up to Amazon. Still, you have the Product targeting option. You’ll once again have to draw on your SP auto campaigns, this time your SP Product Target campaigns, also known as SP PAT campaigns.
You know which ASINs have high conversion rates from your SP PAT campaign reports, and you can put the same list of targets into your SD campaigns as a starting point. Sponsored Display will need a different strategy, too.
First, we recommend you to target direct competitors, from 5 to 10 of your biggest ones. You should know these big players at all times, so this step is easy. Make sure your offers and listings are better than these 10 targets you’ve found before you run your SD campaign. Similarly, you can also target any products that are showing up in the “Frequently bought together” section of your product detail pages.
Next, we recommend running both SD Product target campaigns, and other Campaign Types like Views Remarketing and Audiences. The point of Sponsored Display is to be re-engaging shoppers, something that SP and SB ads don’t do. Set up Views Remarketing, narrow down the segments you want to target in Amazon Audiences, set aside a decent campaign budget, and then let Amazon do the rest for you.
Amazon PPC is a complicated beast, as we’ve made abundantly clear by going through the ins and outs of it. The only way to succeed in the Amazon Advertising space is to be pragmatic, and most important of all, to be structured. We hope this guide on how to structure your Amazon PPC campaigns will help you in both the short-term and long-term health of your Amazon business.


