
Last Updated on May 16, 2022

Google Merchant Center Feed Rules are a great way to make changes to your google shopping feed.
They allow you to easily add, remove or edit product data to make sure you comply with Google’s recommendations, or optimize your feed to get better results.
In this article, we’ll take a closer look at how feed rules work, and how you can get started with them.
Table of Contents
What are Google Merchant Center Feed Rules?
Feed Rules in Google Merchant Center allow you to make changes to your product feed based on specific criteria that you define.
You could for example add custom labels, improve product titles or exclude products from showing up.
Most merchants struggle to make these changes in their ecommerce platform or want to create a slight variation of the product data specifically for Google Shopping.
Feed Rules allows you to create these variations.
How do Google Merchant Center Feed Rules work?
Google Merchant Center Feed Rules are easy to understand. It’s very similar to the if-then function in basic programming: if a certain condition is met for a product, then your rule will be applied to it.
Let’s say that the Christmas season is coming up and you want to add “Christmas Sale” to your product title for all products of a specific brand.
If you don’t want to change the product title on your website, you can use Feed Rules to just change the title in your product feed.
So in this case you can create a feed rule that appends the phrase “Christmas Sale” to the end of the product title, but only for the brand in question, not your other products. When applied, all products from this brand will have titles that look like this “Product Title Christmas Sale”.
This saves you from having to edit products one by one.
When to Use Feed Rules?
There are many different applications for Feed Rules. But in general, they fall into three buckets:
1 Add or Change Required Data
The first one is to add data that is required by Google, but which is currently not in your product feed, or they’re not in the correct format.
When product information is missing, Google will usually tell you with a warning or disapproval of the products in question.
Armed with the info of what needs to be changed, you can then start to set up a feed rule to fix this!
2 Add Additional Information
Besides the information that Google requires, there are also a bunch of things you can change to your feed to make it better.
You could add extra variables to your product titles, or you could add meta info like the gross margin of your products. This last one can then be used to organize your Shopping campaigns.
3 Clean Up Feed
Sometimes there are problems with useless information being pushed into a product feed.
Feed Rules give you the ability to optimize and clean up your feed, and do it in bulk!
3 Practical Examples of Feed Rules
Now that you understand how Feed Rules work in Google Merchant Center, let’s look at 3 common situations where you would use them.
Example 1: Change product titles
People are likely to include brand names when they search for products online. So as an advertiser, you can optimize your product titles to make sure they will appear for branded searches.
Take the following product: “Superfood Kale Antioxidant-Rich Face Cleanser”:
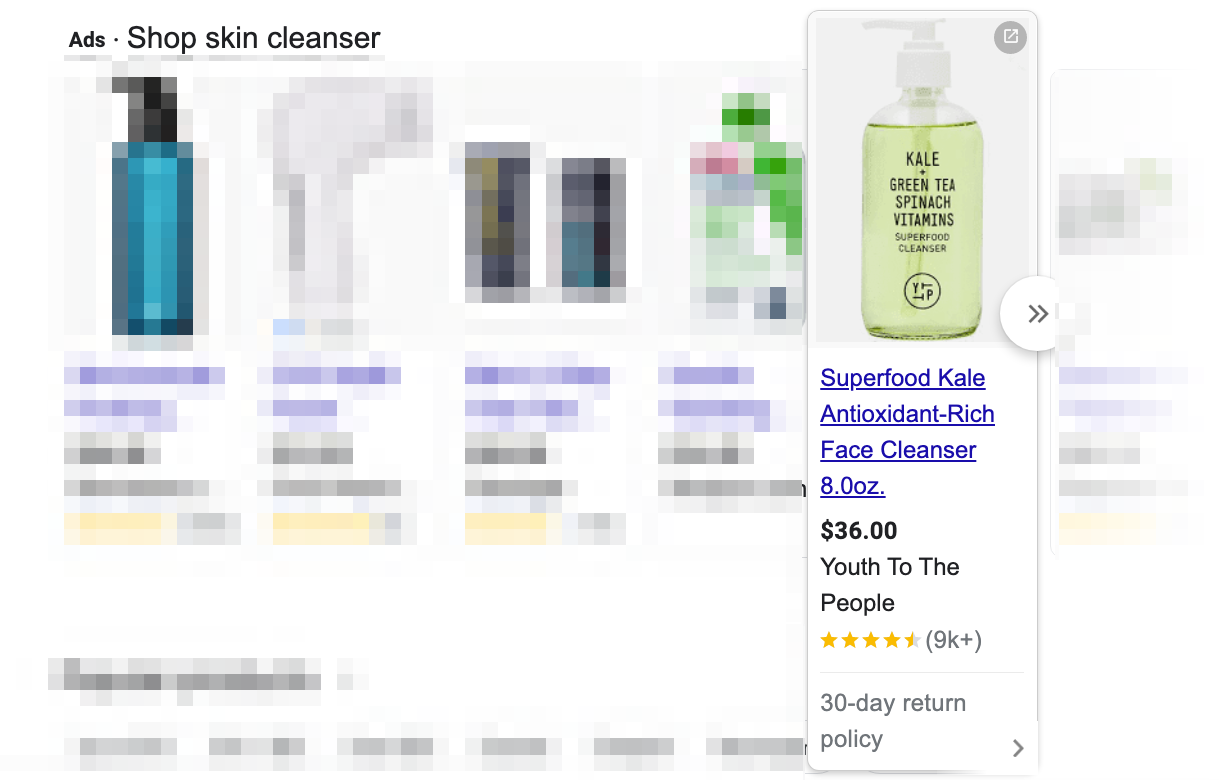

You can see that the brand isn’t included in the title, but we might see in the search terms report that many people are searching for this brand.
So we could set up a feed rule to append “Youth To The People” to the current title.
Example 2: Remove text from the description
Feed rules allow you to remove specific words or phrases from your product feed.
For instance, phrases like “free shipping” are not allowed by Google in your product descriptions.
So you could set up a feed rule to remove specific words from your descriptions.
Example 3: Adding price brackets
One of the best use cases for feed rules is to create custom labels to add extra information to your feed.
A very common use case is to add the price bracket for each product as a custom label. That allows you to later organize your Shopping campaigns based on this.
This can be a merchant that groups its products into 3 buckets, depending on the product price:
- 0-10
- 10-40
- > 40
Google Merchant Center Feed Rules vs Supplemental Feeds
Besides Feed Rules, Google Merchant Center has another way to edit product data, it’s called supplemental feeds.
These are extra feeds that can be used to update product data from the original feed.
Because feed rules and supplemental feeds are so similar, people often get confused about which method they should use.
You could probably do all edits to your product feed using either method, but one will often be easier than the other.
Here are a couple of common edits advertisers make, with the “best” method added: want to make:
- Add gtins: use supplemental feeds
- Add brand to product titles: feed rules
- Add keyword-rich info to product title: supplemental feeds
- Add price brackets through custom labels: feed rules
- Exclude products from certain destinations: supplemental feeds
- Adding a promotion id: supplemental feed
Review this table below on whether to use Feed Rules vs Supplemental Feeds:
| Feed Rules | Supplemental Feeds | |
| Custom values per product | hard | easy |
| Adding new attributes | easy | easy |
| Use existing product data | easy | Not possible |
| Bulk changes | easy | easy |
| Stays up to date | easy | hard |
| Leverage information from outside feed | Not possible | Easy (formulas) |
Google Merchant Feed Rules vs Other Data Feed Tools
The section above covered what’s possible within Google Merchant Center, either with Supplemental Feeds or Feed Rules.
Here, I want to cover the main differences between Feed Rules and other data feed tools like Datafeedwatch, Channable, or Godatafeed.
Here is how they compare:
| GMC Feed Rules | Other Data Feed Tools | |
| Basic Functionality | Make basic changes to product feeds in Google Merchant Center | Manage product data across different channels |
| Channels supported | Google Shopping | Google Shopping, Facebook, Instagram, Amazon, eBay, etc. |
| Multiple feeds | Possible but need to re-create rules for every feed (like different countries) | Easy to copy / paste rules for all feeds |
| Price | Free | > $29/mo |
| Providers | DataFeedWatch, Channable, Godatafeed |
How To Set up Google Merchant Center Feed Rules
Feed Rules might seem simple on the surface, but they can get quite complex!
So in this section, I first want to show you the basic version of how to set up a feed rule. After, we’ll take a look at all the extra tweaks you can make to your product data.
Note: Before you can create a feed rule, you need to have a primary feed in Google Merchant Center. How that feed is uploaded doesn’t really matter, the Content API, Google sheets or a scheduled fetch are all fine!
Creating a new feed rule
Let’s get started!
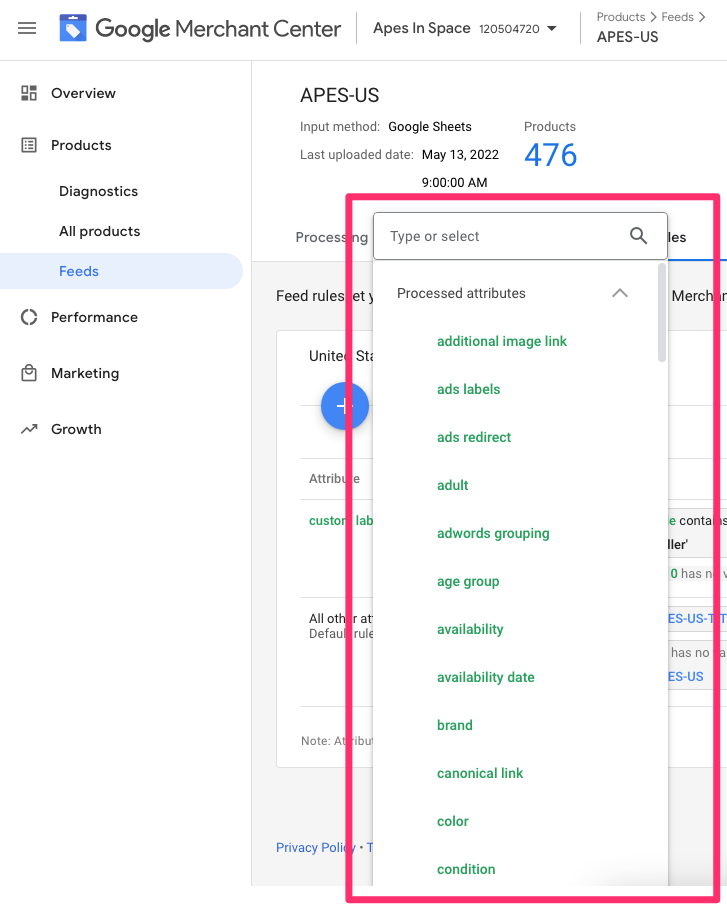
When you’re logged into your Google Merchant Center account, find the left-hand menu, click Products, and choose Feeds.
This will display all the product feeds in your account.
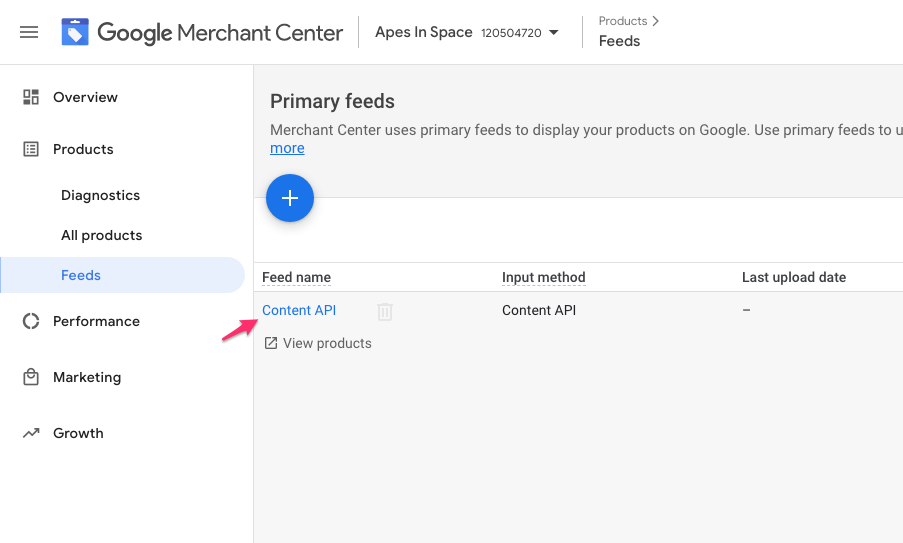

Select the product feed you would like to create the feed rule for and click the Feed rules tab on top of the page.
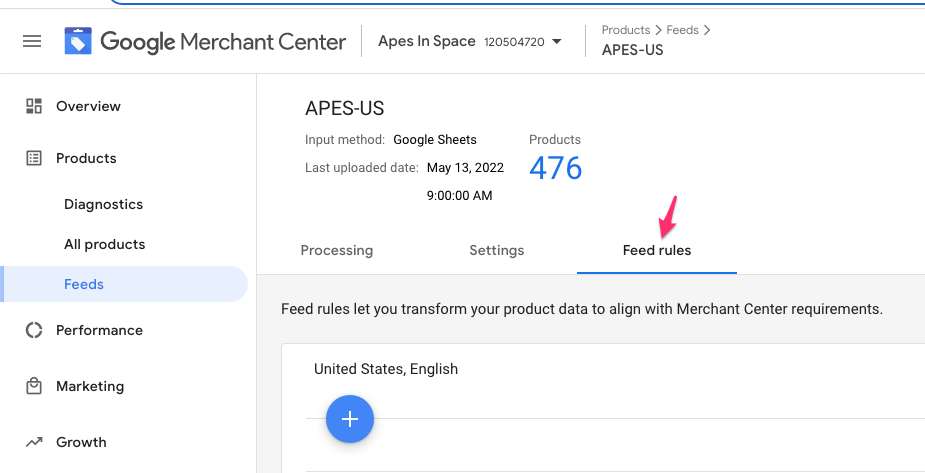

Click the big blue button to get started.
First, you need to choose the attribute you want to create a rule for from the drop-down list.

Now that you know which attribute you’re going to change, you’ll need to select the conditions of when a certain rule should be applied.
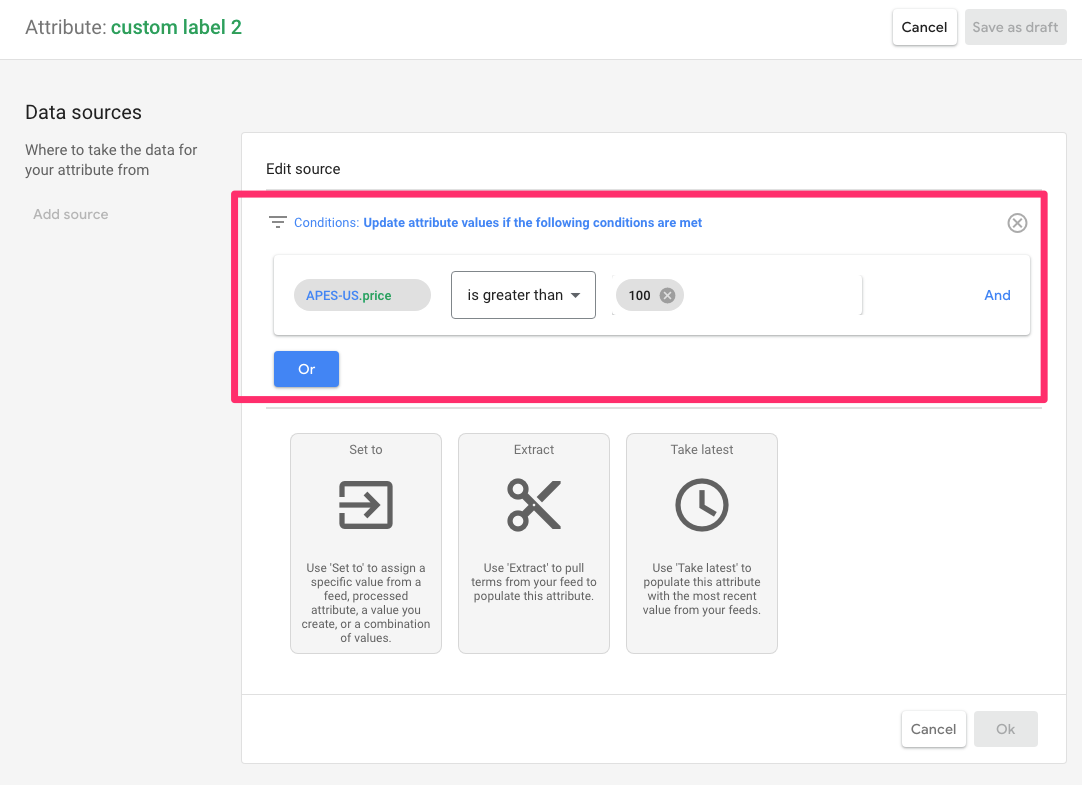

In the screenshot above, I want to set the custom label 2 to a specific value if the product price is greater than 100.
Next, I can set an actual value for the custom label 2:

Note that Google calls this section the “data sources”. I find that this term makes things needlessly difficult, that’s why I avoid using that phrase!
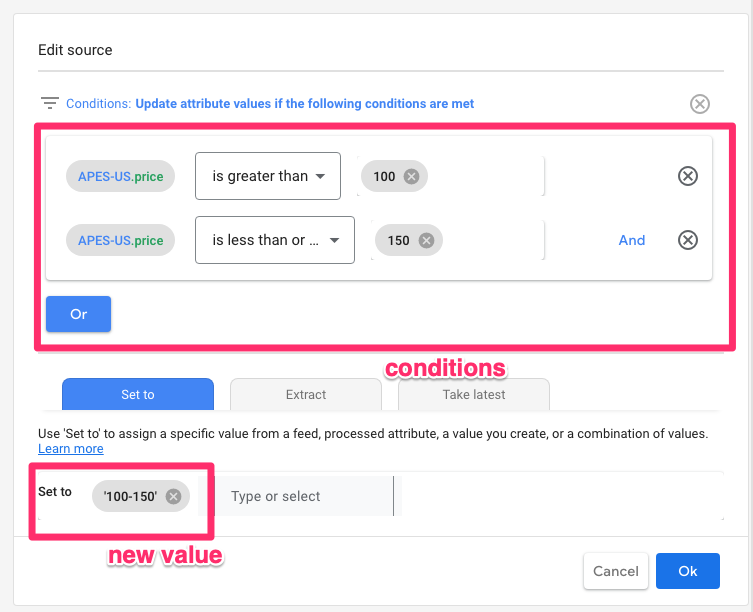
Sometimes you’ll only need to set up a single rule. But in the example above, we actually want to set up multiple price buckets depending on the product price.
So the end result might look something like this:
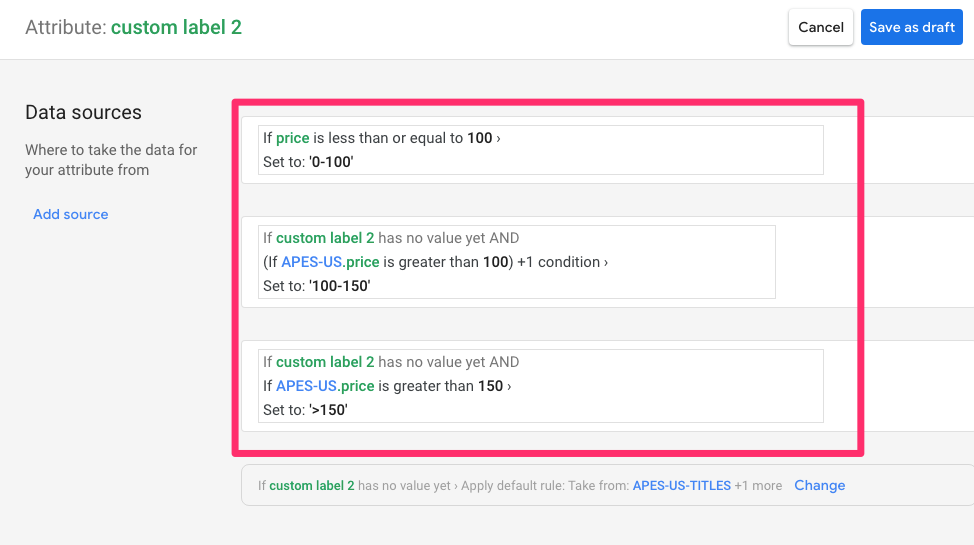

Depending on the product price, one of 3 values will be added for custom label 2.
You can have more complex setups combining the AND and OR rules.
When you’re done with adding rules, click the Save as draft button.
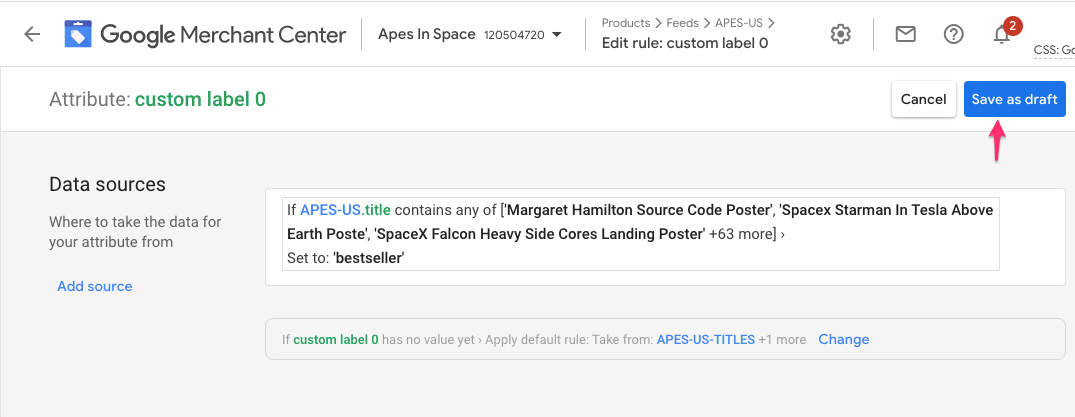

That will save the rule you’ve just set up and bring you back to the feed rules overview.
Now that you’ve seen the basics of how to add a rule, let’s look at the details!
Changing the Default Value
You have a few different options when you’re setting up the actual rule.
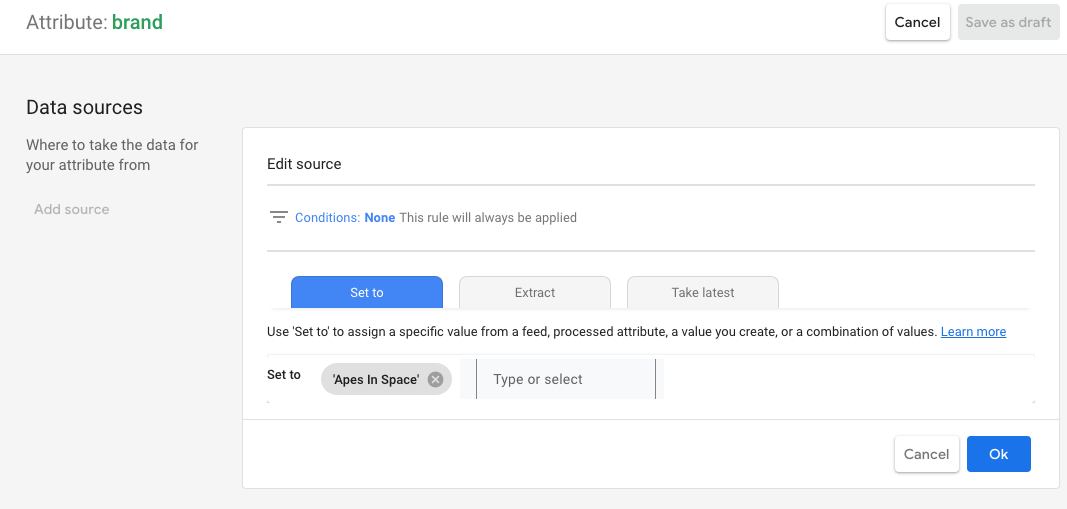
Using “Set to”
With the Set to option, you can populate a product attribute with a combination of static values taken from your primary or supplemental feeds. Or with extra text that you add.
This is probably the most common way that people use feed rules.
Let’s take a look at a couple of examples.
If you want to add a static value, like a brand to your product feed, you can do this like this:

If you want to reuse information that’s already in your feed but in a different attribute, you can do that as follows:
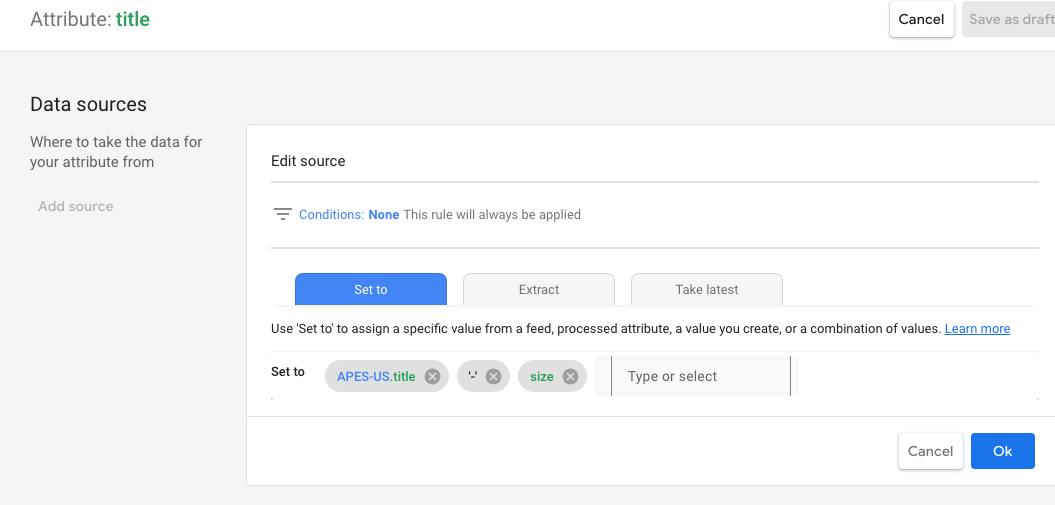

The example above will replace the existing product title, with the “title size”.
Using “Set to multiple”
The Set to multiple operation is only available for the following attributes: included_destination, excluded_destination, and shopping_ads_excluded_country.
This operation can be used to assign an attribute with a list of values from your product feed.
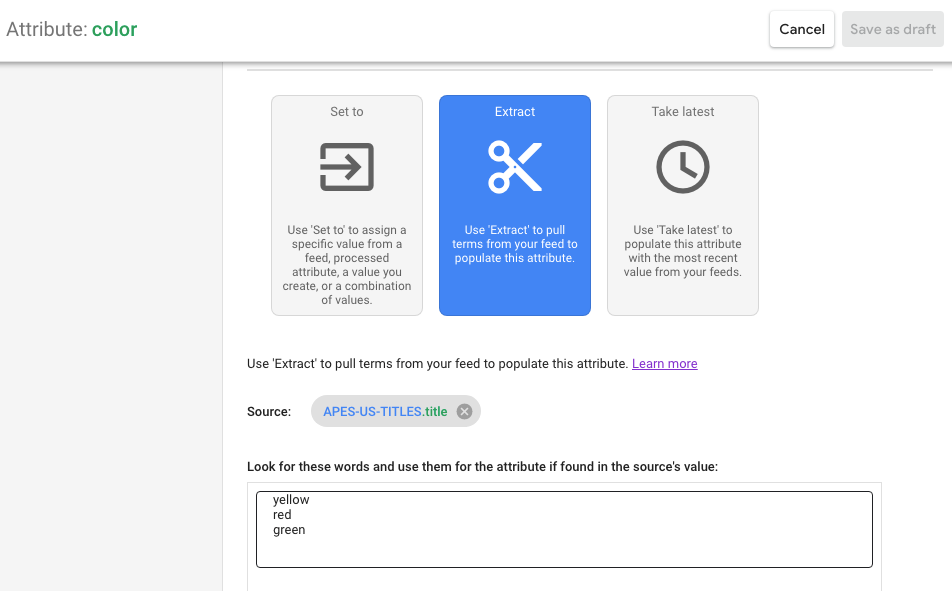
Using “Extract”
With ‘Extract’ you can pull terms from your feed to populate another attribute.
You could for example pull the color value from your product title to populate the color attribute.

Using “Take latest”
The Take latest operation is only relevant for the attributes availability and price.
Its main use case is if you could have different values in different feeds. For example a primary feed and your supplemental feed.
Using Modifications
In some cases, it’s not enough to just add values, but you want to make modifications to existing values.
Note: the modifications you’ll see in the Google Merchant Center interface depend on which attributes you’re editing. So you might not see all of the ones we’ve listed here.
Prepend
You can use the Prepend modification to add words or phrases at the beginning of an attribute value.
Append
In contrast, Append can be used to insert words or phrases at the end of an attribute value.
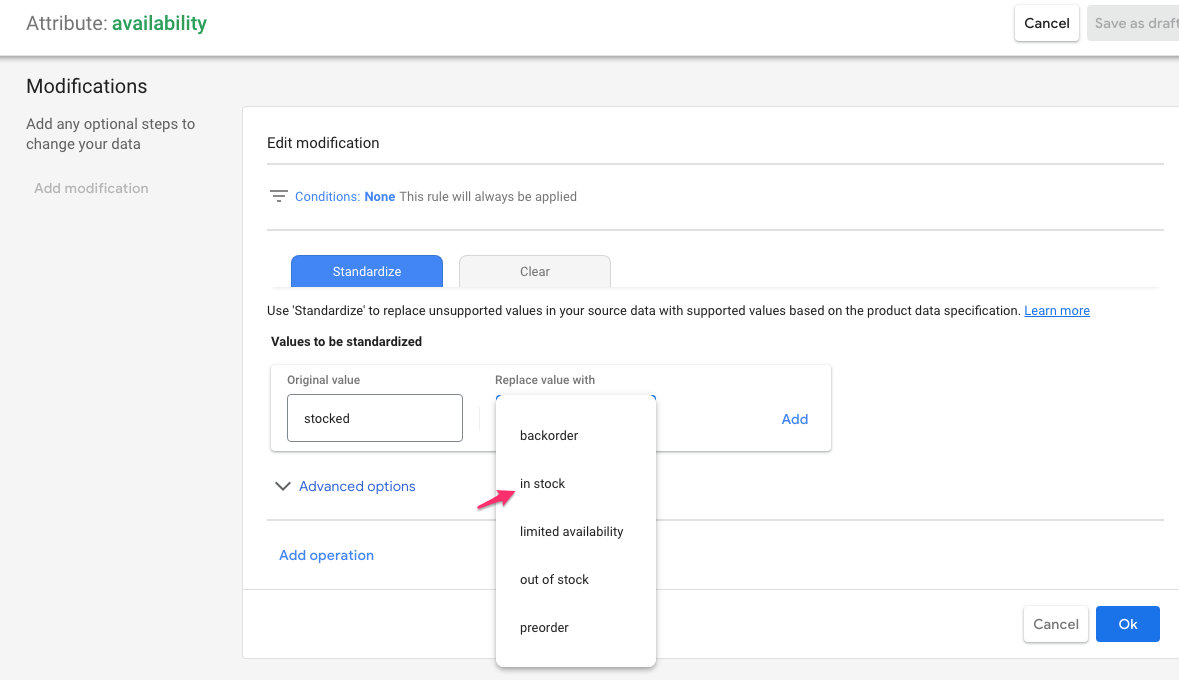
Standardize
This modification is only available for attributes that have a limited set of potential values, like condition or availability.
The Standardize modification will look at the values you have in your feed, and replace unsupported with supported values. option.
For example you might use the value “stocked” in your ecommerce platform, but according to the Google data specification, that value needs to be “in stock”:

Add repeated field
For attributes where you can submit multiple values like additional image link, excluded destination, and included destination, you can use Add repeated field to insert a secondary value.
Optimize URL
You’ll find the Optimize URL modification useful for attributes where you need to change or remove the URL.
Find & replace
Use this to find words or phrases and replace them with new values. This modification further optimizes your feed and improves search terms.
Calculate
You can also perform computations to numeric values in your product feed. With the Calculate modification, you can multiply, divide, add, or subtract numeric values.
Split & choose
Split & choose lets you select one or more items in a comma-separated list and use them to populate an attribute value. There are three functions you can use for this operation: Split, Select, and Combine.
- Split: Use this function to determine at which type of node or symbol you would prefer to separate your list.
- Select: Choose which of the nodes or elements you would like to use.
- Combine: For multiple nodes, you can use this function to bind them into a single value.
Let’s say the brand has been added to the end of each product title, but it’s not available yet in the “brand” attribute. This modification allows you to split it off.
Clear
To remove the value of an attribute, you can use the Clear option.
Applying your Feed Rule
After configuring your feed rule, the last step is to test and apply it.
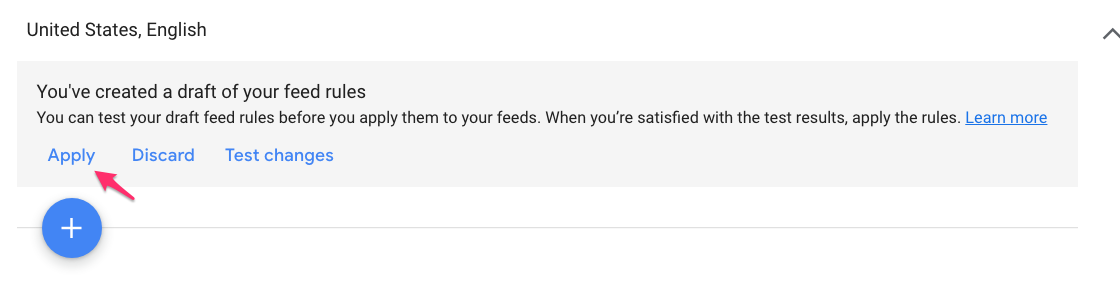

Clicking the “Test changes” link might seem like the logical next step, but it literally takes ages for GMC to “test changes”.
So what I usually do is click Apply instead, and then go check if the correct information is in the feed.
If you notice that something is off, simply go back into the rule and make the necessary adjustments, or delete the rule altogether.
This is way faster than waiting for the test to finish.
Working With Feed Rules
Whether it’s to clean up your feed in order to fix errors or optimize it, it’s all possible with Feed Rules in Google Merchant Center.
This article has shown you the most common applications and includes the details on how to configure Feed Rules correctly.
This should arm you with the skills to turn any product feed from mediocre into great!


![Ecommerce Team Job Description Templates [Download] | Salsify](https://thegateway.net.au/wp-content/webp-express/webp-images/uploads/2021/04/ecommerce-team-job-description-templates-download-salsify.png.webp)

