
Last Updated on April 21, 2022

To get better results from Google Ads, you need to make changes to your campaigns.
And every tweak you make to your campaigns literally is a mini-test.
Google Ads has a special feature called Google Ads Experiments, which allows you to properly A/B test changes to a campaign.
In this article, we’ll explore what exactly Google Ads Experiments are, and how you can use it as part of your workflow.
Table of Contents
What is Google Ads Experiments?
Here is the short description from Google:
Google Ads experiments can help you continuously improve the performance of your campaigns. By testing different campaign settings, you can reach more customers and drive better results quickly and efficiently for your business.
In my own words, Google Ads Experiments allows you to test the performance of an alternative version of a campaign in order to improve a campaign’s performance.
When should you use Google Ads Experiments?
Let me start out by saying that Google Ads Experiments is overkill for most of the changes you’ll make to your campaigns.
Most changes that advertisers make in Google Ads are small tweaks. For example:
- Changing the max CPC of a product
- Adding a new keyword to an ad group
The consequences of these changes usually are pretty limited. If you change the max CPC and suddenly the actual cost per click is too high, then you can simply lower it.
But some of the changes feel a lot riskier. Like switching a campaign that’s doing well from enhanced CPC to Target ROAS bidding.
That’s a BIG change, which can cause big swings in both the number of clicks and the sales that you’ll see.
This is exactly where Google Ads Experiments shines. It helps you to reduce the risk by testing an alternative version of a campaign on a subset of traffic.
In the example above, you could send 50% of the traffic to the version using enhanced CPC, and 50% to the version that uses target ROAS bidding.
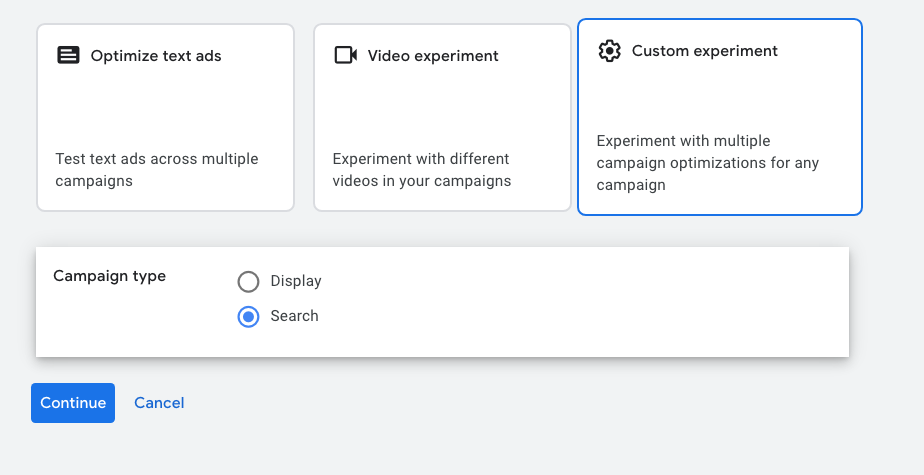
3 Types Of Google Ads Experiments


Google Ads Experiments offers 3 types of experiments to run:
- Optimize text ads
- Video experiment
- Custom experiment
While the first 2 are pretty limited in scope, the custom experiment allows you to make any change to your campaigns.
Let’s explore these in a bit more detail!
Experiment type #1: Optimize text ads
With Optimize text ads experiments, you can test variations of your expanded or responsive search ads.

There are three types of variations that you can create.
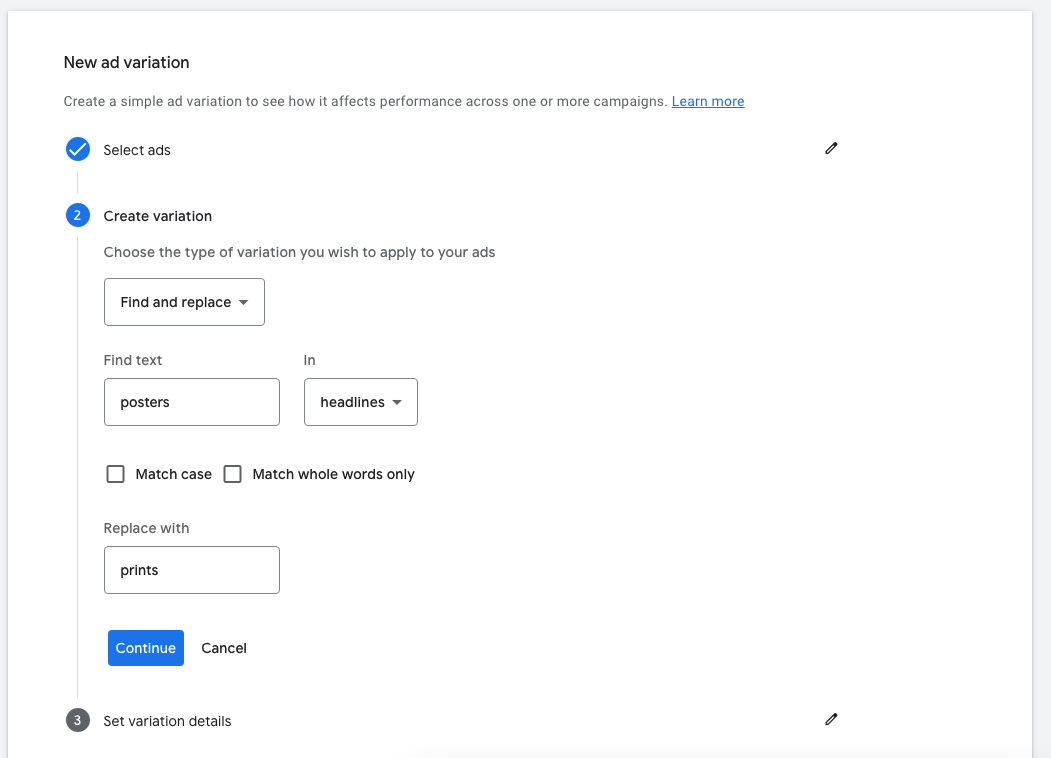
1 – Find and replace
The first ad variation you can create is to change the text you want to swap out in which part of your ad.
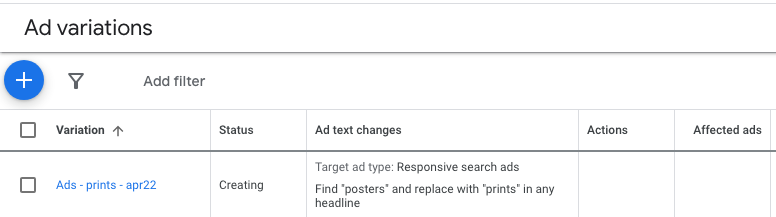
Here is an example of an ad variation that replaces the word “posters” with “prints” in all headlines:

2 – Update URL
This second option allows you to change the details of the URL.
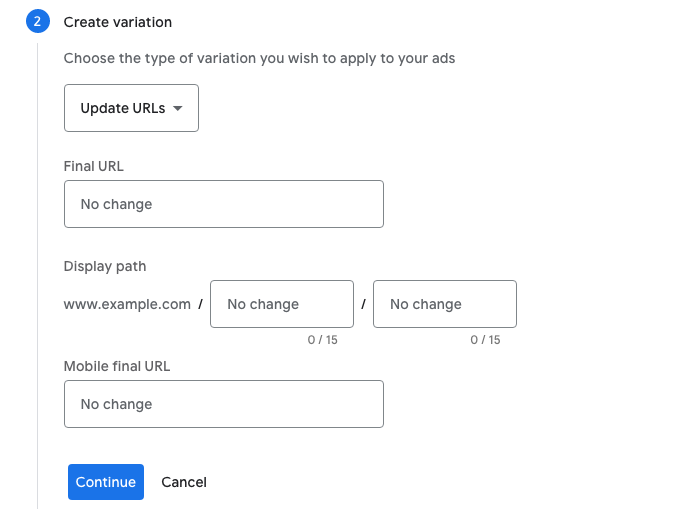

This is ideal to A/B test different landing pages for an ad, as it allows you to split your traffic 50-50. If you created a duplicate ad with a different URL instead, that ad wouldn’t always have the same visibility as the original one
Another option is to test a different Display path. Although it’s possible to test, this will usually have a minor impact.
3 – Update text
The third option to create ad variations is the “Update text”.
This allows you to Add, Remove or Pin a certain headline or description.
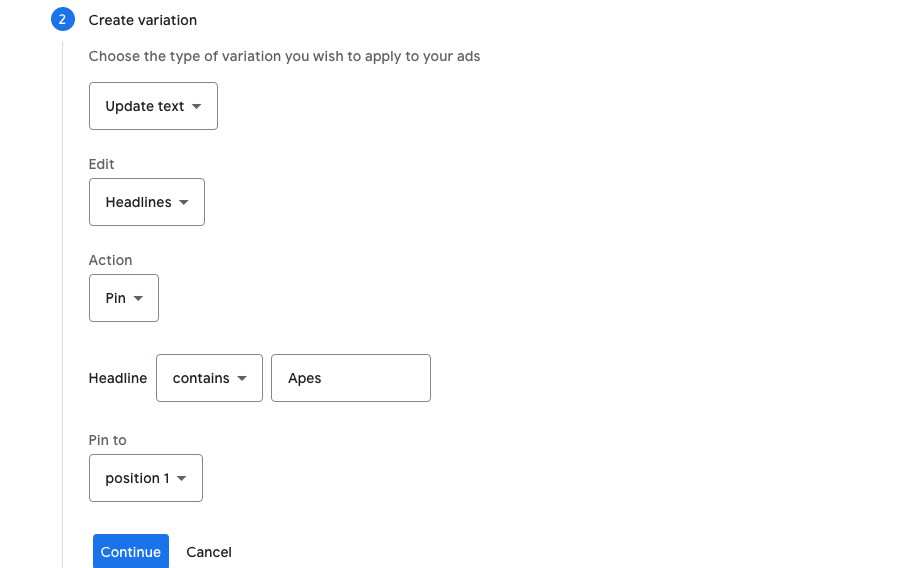

I haven’t found this option very useful, as you’re making very minor changes, which aren’t likely to move the needle.
You’ll have a very hard time to see the impact of adding or removing a single headline.
Experiment type #2: Video experiment
The Video experiment can be summed up as testing the same vide (YouTube Ads) campaigns, with the only difference being different videos.
In order to run an experiment, you create different experiment arms (= copies of the same campaign but with a different video).
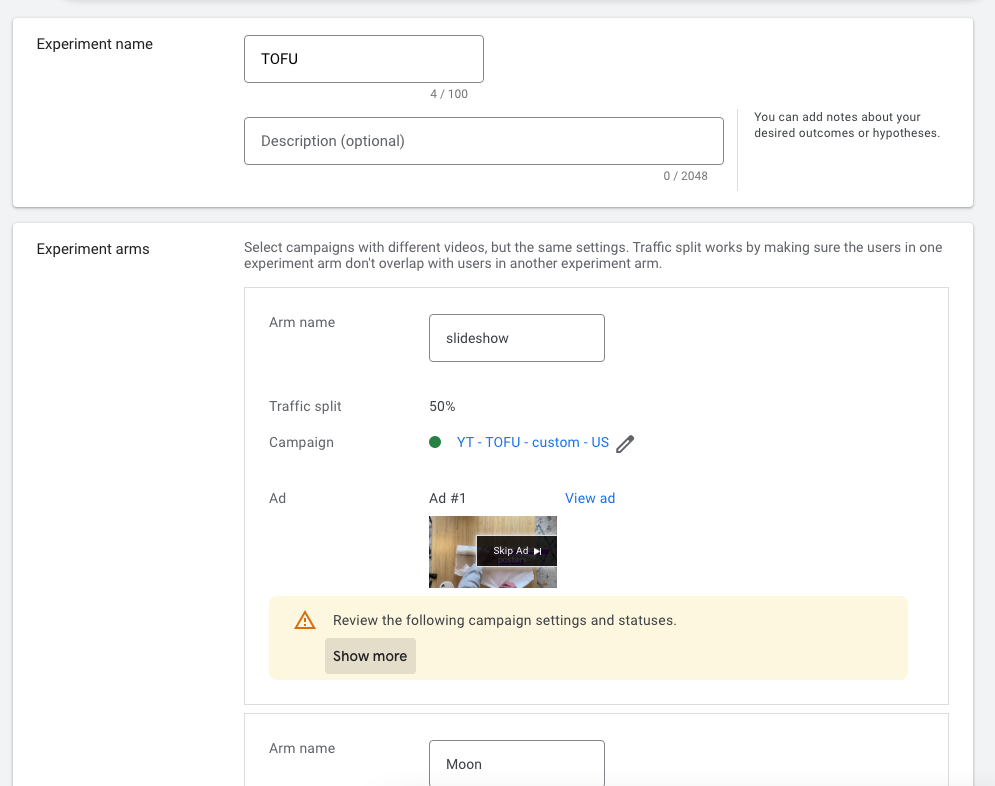

Google Ads will then split the traffic 50-50, and after 100 conversions it will determine the campaign with the lowest cost per conversion.
Similar to some of the ad variations testing options, I find the pre-made Video experiments fairly limited.
The only use case is that the set up allows you to test which ad works best in a very specific context.
It doesn’t really fit with my own process of testing which Youtube videos work best for which audience.
Experiment type #3: Custom experiment
If you’ve read the previous sections, you’ve heard me mention a few time how I think the pre-made experiments are too limited.
What if for example, you want to test an ad variation that doesn’t just pin a single headline, but pinned assets for all positions?
Luckily Google Ads has the custom experiment to allow for all other variations.
This is the one you’ll be using most often.
You’ll first need to select your “Base” campaign. This is your original campaign that will be used as a template.
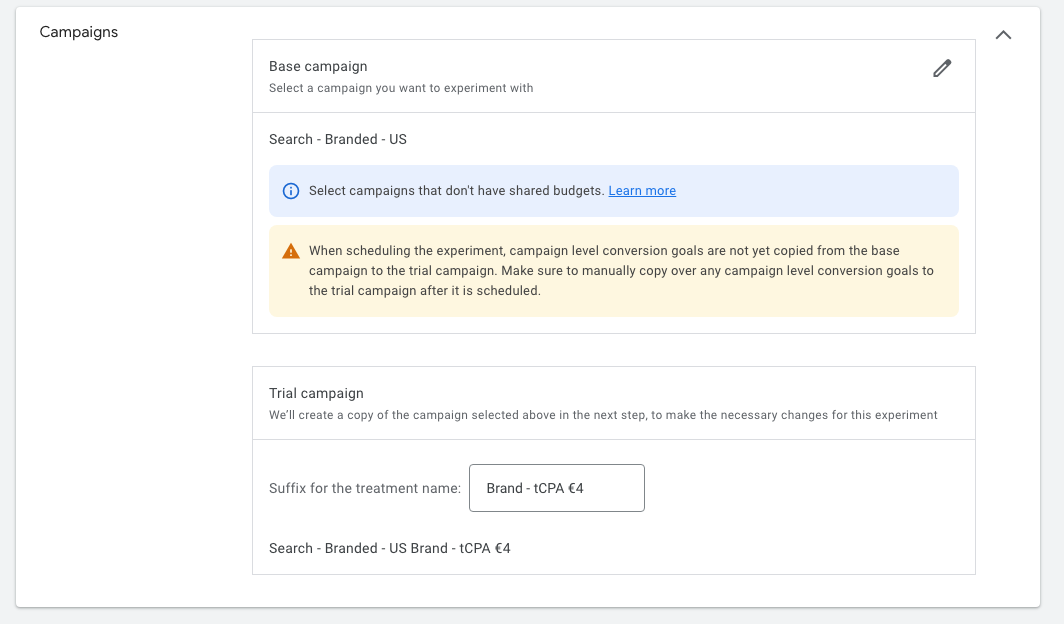

Next, Google Ads will create a Trial campaign, which is identical to the original one, with the exception of the changes that you make.
The sky is literally the limit. You can change everything in a campaign, targeting, bidding strategy, keywords, match types, ads, etc.
Keep reading to get an idea for which test are best to run in Experiments vs making changes directly to your campaigns.
Google Ads Experiments & Google Shopping
Historically, Google Ads Experiments have focused on Search and Display campaigns.
Shopping Ads have always been missing from the campaign type list:
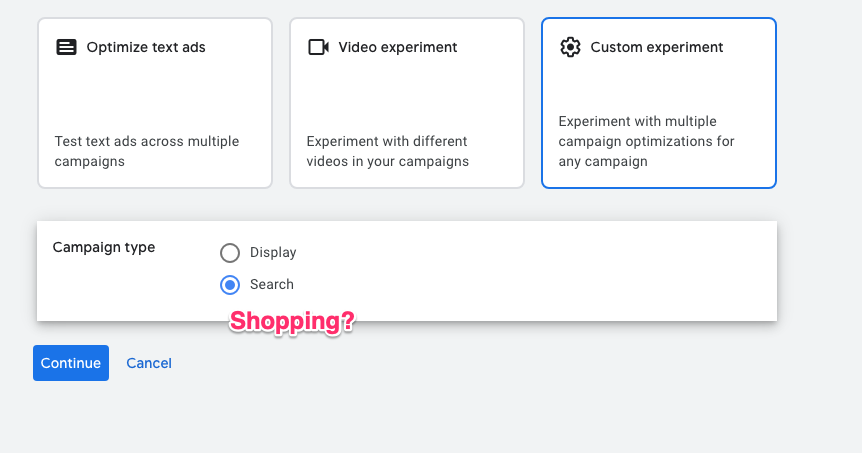

So although it’s not possible to run most experiments on Shopping campaigns, there is one Experiment you can run!
In the settings menu of a Standard Shopping campaign, you’ll see the One-click target ROAS section:
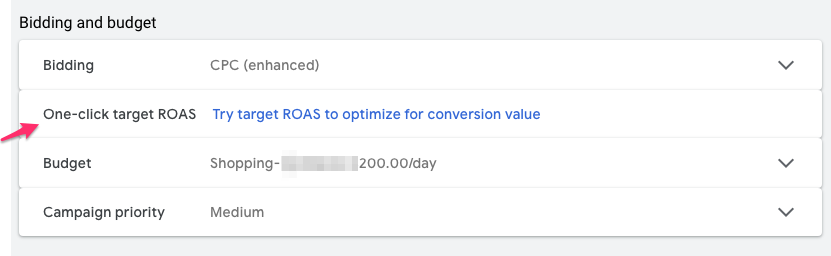

If you click “Try target ROAS to optimize for conversion value”, you’ll see the following menu:
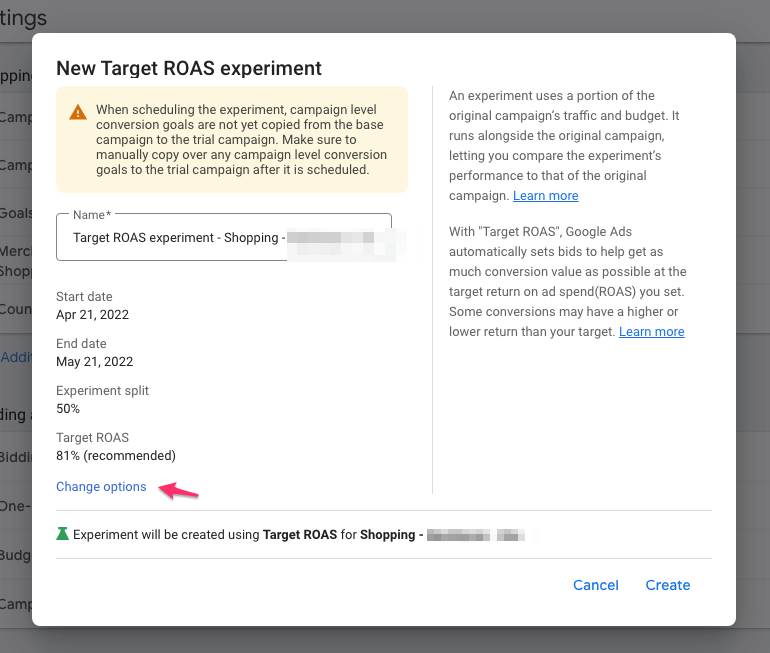

This allows you to set up an experiment that will change the bidding strategy from whatever you had running before, to Target ROAS.
By default, it creates an experiment that lasts for a month, splits traffic 50-50, and uses the “recommended” ROAS. If you click on “Change options”, you’re able to change those details.
From the screenshot above, the main change I’d make is to the 81%, this is too low and would likely lead to a loss for this advertiser.
How to create a Google Ads Experiment
So far, we’ve covered all of the options inside of Google Ads Experiments. In this section, I’d like to get more practical and set up and actual Google Ads Experiment!
To find the Experiments menu, scroll down in the middle column of your Google Ads account, until you see “Experiments”:
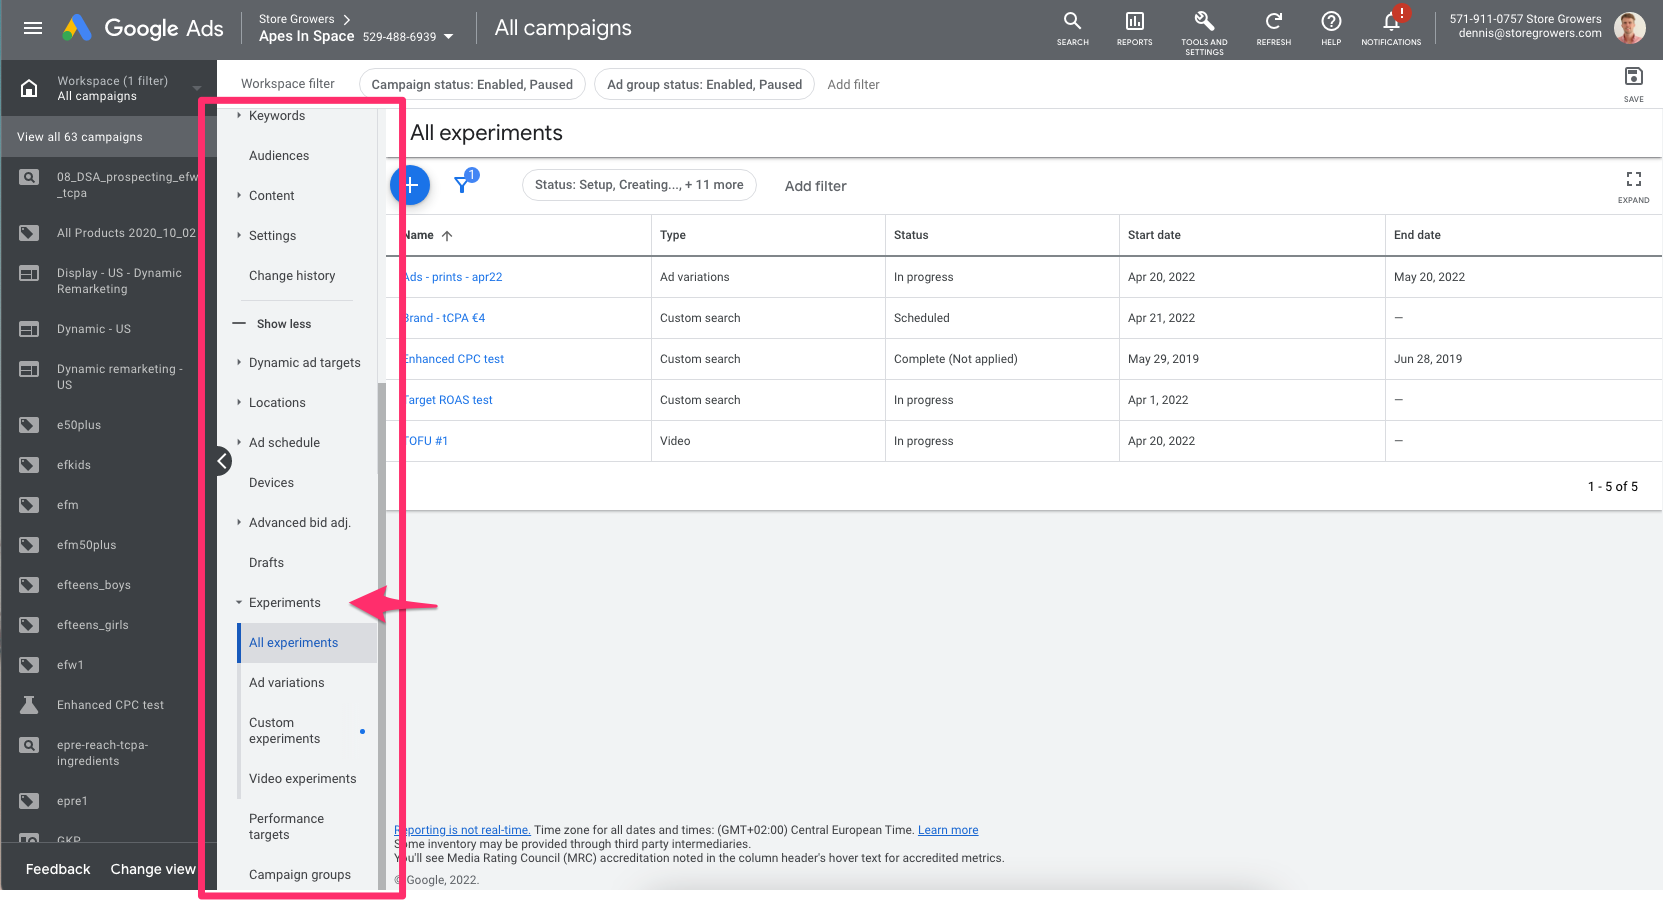

There, you’ll see an overview of all the past and current experiments.
To create a new experiment, just hit big blue plus button:

Next, we’ll create a Custom experiment for a Search Ads campaign, since that allows for the most flexibility.

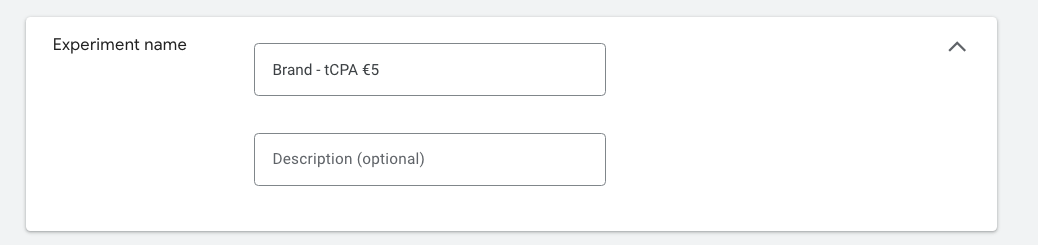
Experiment name
Next, you need to come up with an Experiment name & description.
While you’ll be tempted to quickly add something like “test #14”, try to come up with a name that will make sense if you look at the experiment overview page 6 months from now.
If I’m testing the bidding strategy for my brand campaign, I might name it something like:

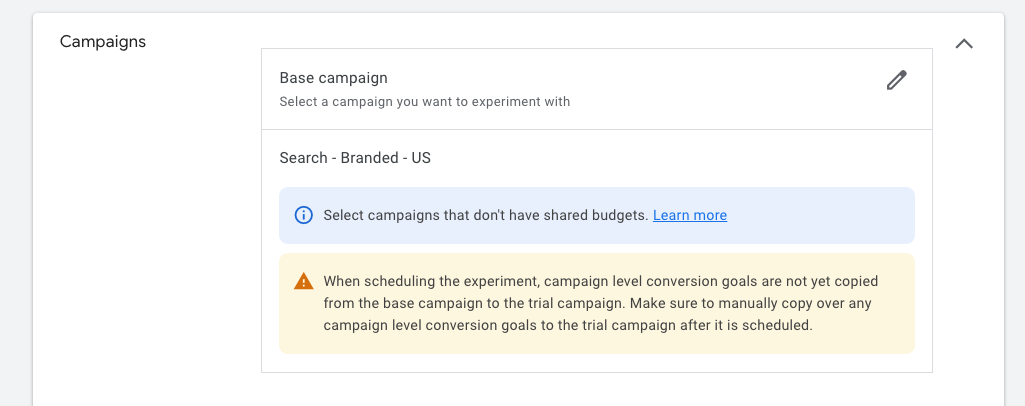
Next, select the Base campaign:

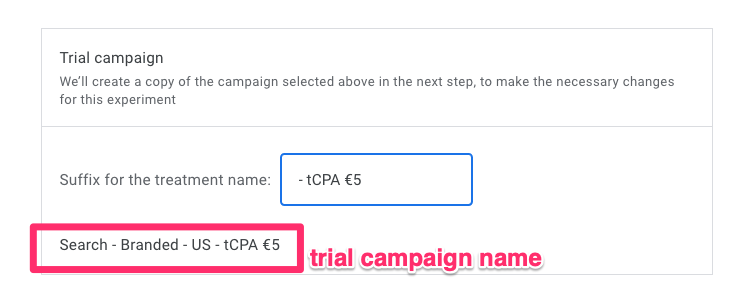
By default, Google will add your experiment name to the end of the Trial campaign name. So with a small tweak, you can make it look better:

If you click “Save and continue”, you’ll start to create your actual experiment:
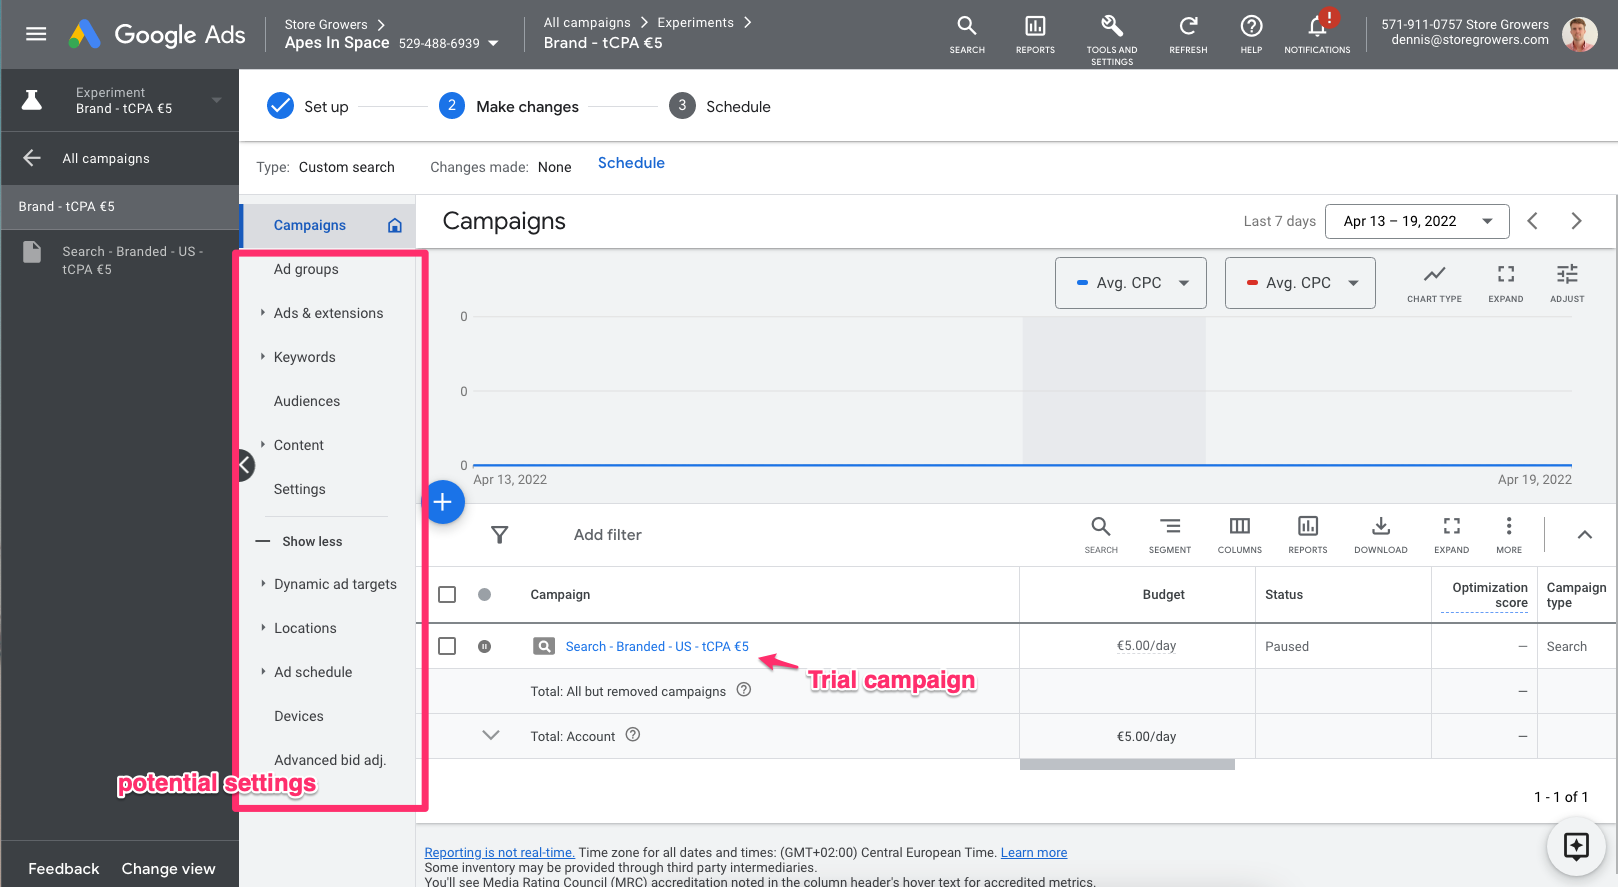

From here, you can click on any of the areas of your campaign that you want to change.
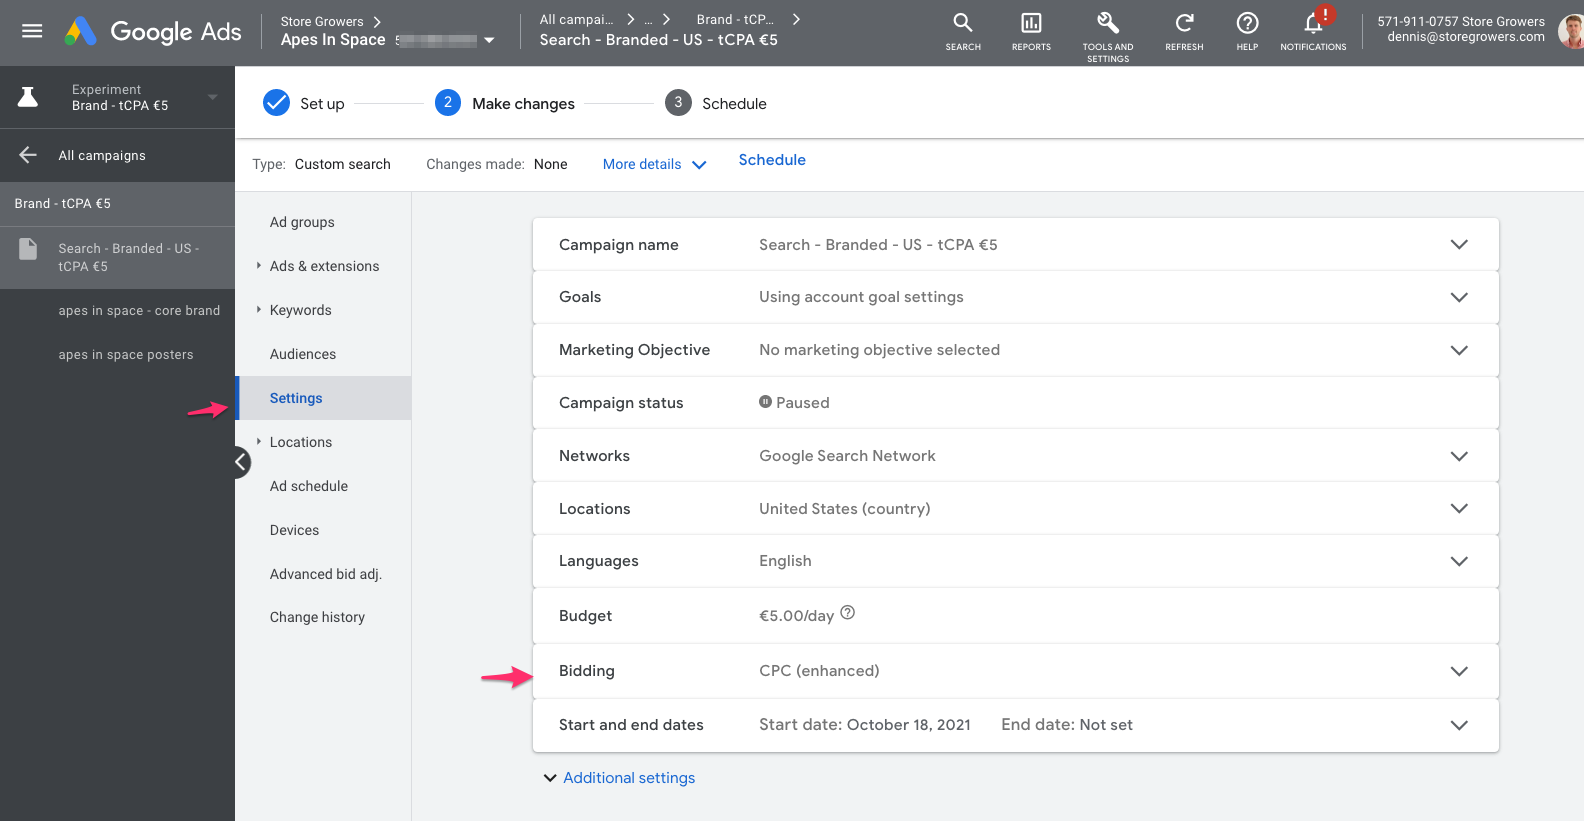

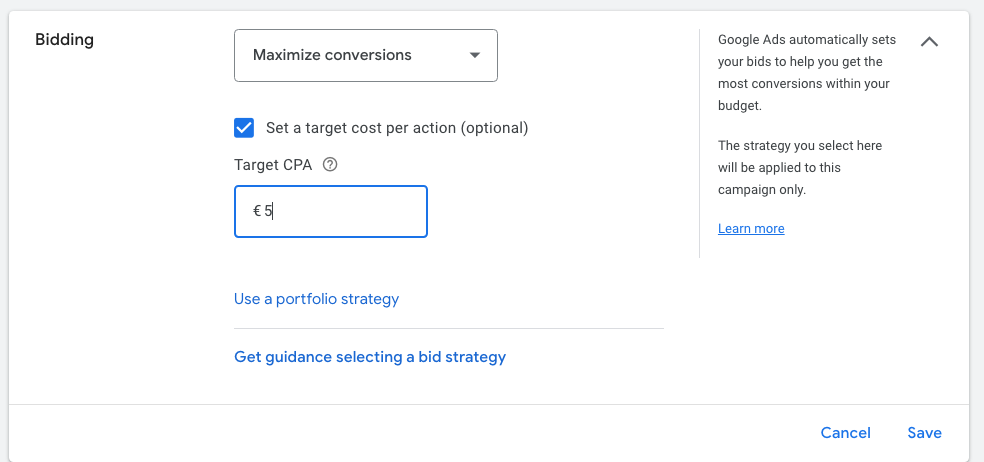
In this case, we want to change the bidding strategy from enhanced CPC to Maximize Conversions.
So to do that, we need to open the Bidding options in Settings:

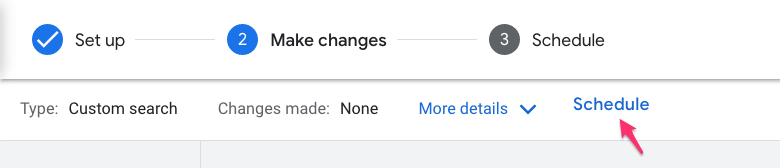
When you’re done making changes, click Schedule in the top menu:

Experiment goals
Before the experiment can go live, we’ll select 2 goals that work as the goals.
Which ones you select will depend on the experiment you’re doing, but in this case, we’re mainly interested in conversions and cost per conversion:


Once you start the test, you’ll have access to all metrics, so don’t worry too much about which ones you select.
Experiment split
Next, we need to define the experiment split. This boils down to how much of your traffic is allocated to each variation.
Usually I’ll keep this to 50-50, this ensure you get enough data to reach a conclusion.
If it’s a risky change and you have tons of conversion data (> 100 conversion in the time frame you’re going to run the test in), you can go with a smaller traffic split like 70/30 or 90/10.
Under the “Advanced options”, you can get into the nitty gritty details of the actual test:
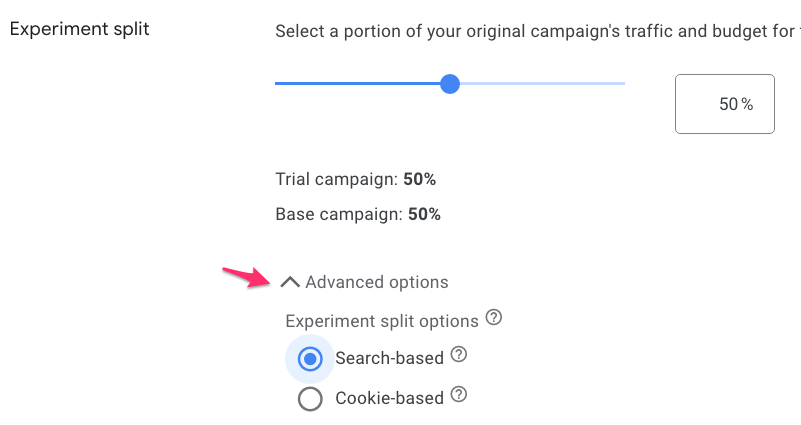

- Search based split: every time someone searches, they’ll see one of the 2 variations
- Cookie based split: once a person has seen one campaign, they will continue to see that campaign
By default it’s set to search based and that’s what I would keep it at in most cases.
Experiment dates
Next you need to define the time you want to experiment to run. You can either choose to leave it open indefinitely, and then end the experiment when you want to.
Or you can choose to end it after a certain number of days or on a certain date.
The right answer here really depends on what you’re testing. But if it’s your first experiment, you can just leave it at none.
Note that an experiment will always start the next day, since it wants to get a full 24 hours of data!
Enable Sync
While your experiment is running, you might need to intervene in the Base campaign on something that’s unrelated to the thing you’re testing.
Let’s say a promotion has ended and you want to remove a certain headline from all your ads.
With the “Enable Sync” option, you Trial campaign will sync to the base campaign to make sure that all changes automatically sync.
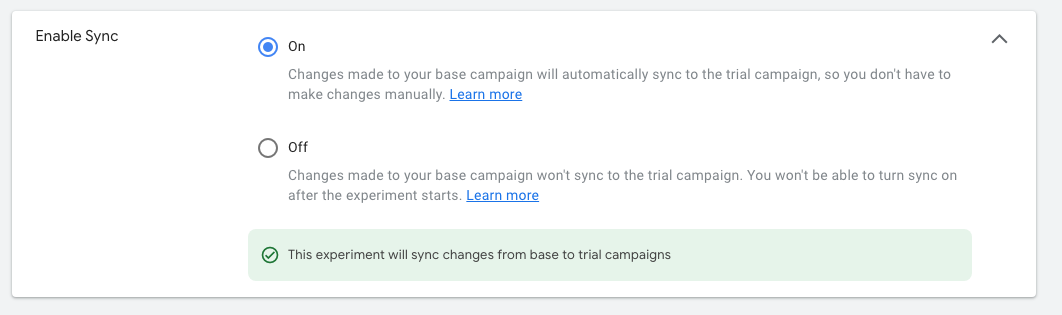

This really is a great new addition to the experiments feature, as before you were afraid to touch the existing campaign in order to not screw up your test results.
When you’re all done, hit “Create experiment” in order to create the experiment.
Running Google Ads Experiments
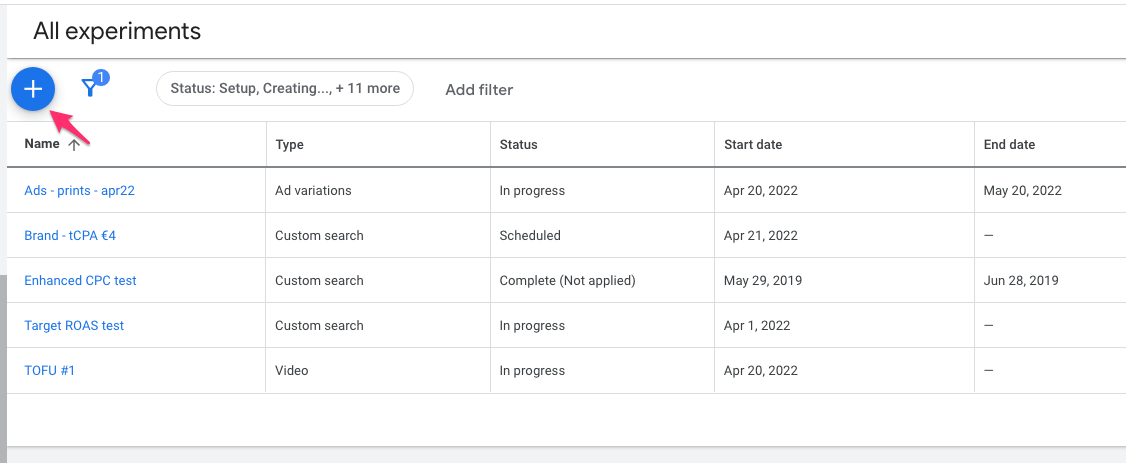
Once you have an experiment running, you’re able to see it on your Experiments page:
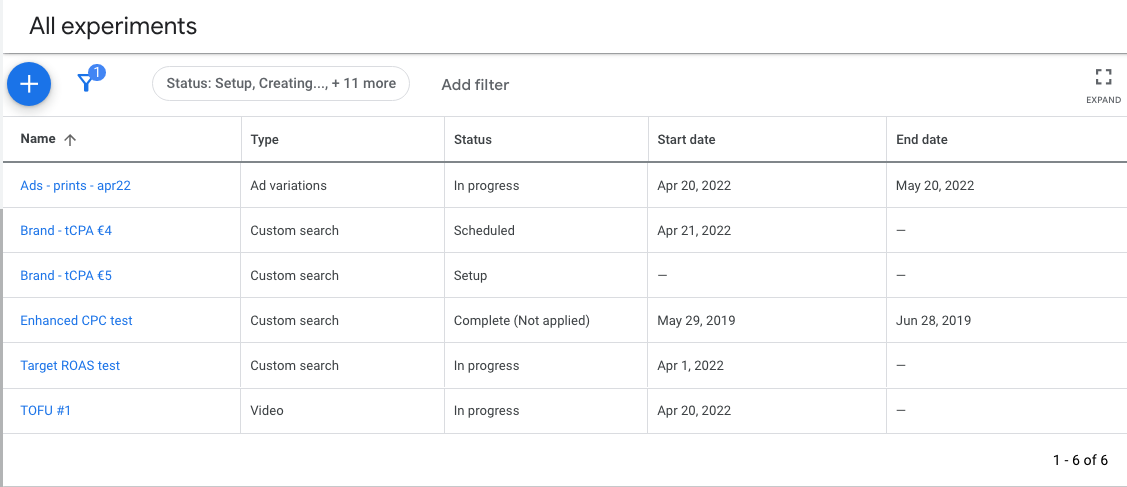

You can see the name, type, status and dates.
Most of these are pretty self explanatory, but through the status, you can actually get a pretty good picture of what you’ve done in terms of experiments.
In progress experiments
If you click on an experiment that’s in progress, you’ll see the current metrics:
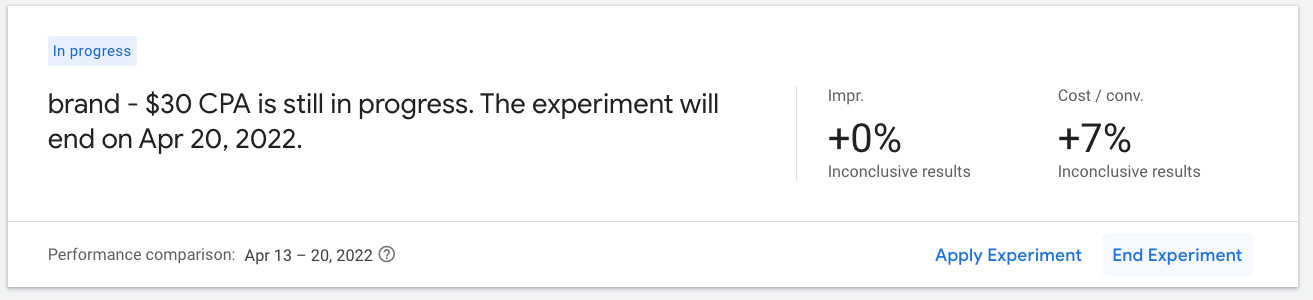

For the experiment in the screenshot above, the results are still inconclusive.
That can either be because the changes are not impactful enough, or if not enough time has passed.
At any point, you have the option to either End the experiment, or apply the experiment to your campaign.
This last one will “overwrite” the Base campaign with the Trial campaign. That means that any changes will become active on 100% of the traffic.
Completed experiments
For completed experiments, you can still see the results:
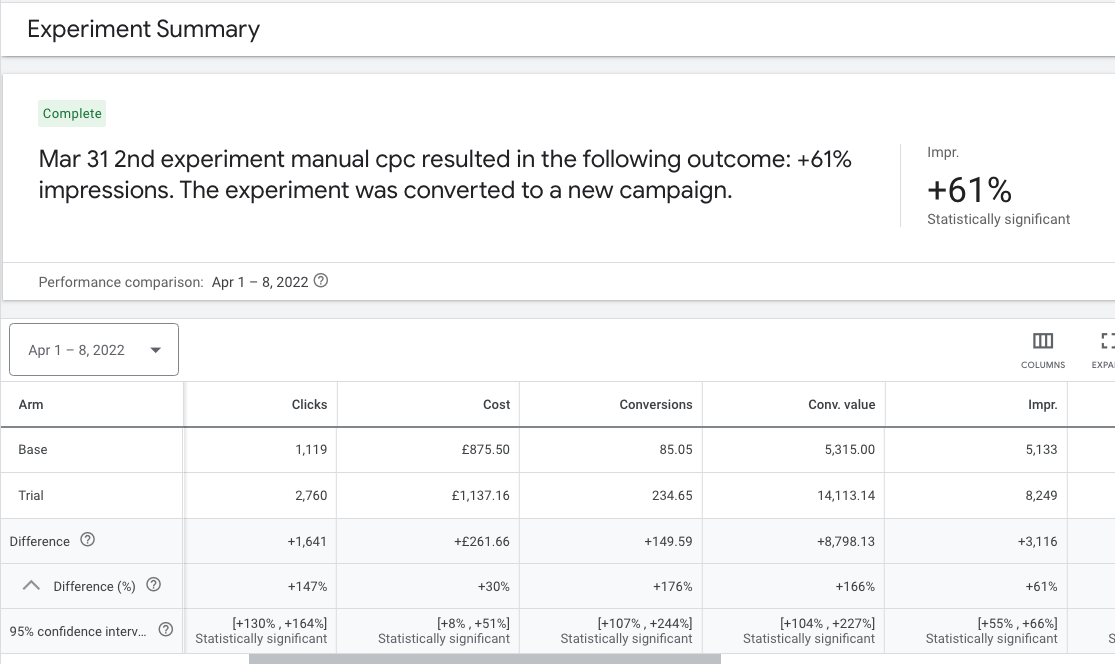

The screenshot above shows all the details for the two “Arms” ( = variations).
Then for every metric, it gives you the details about the difference between the Base and the Trial.
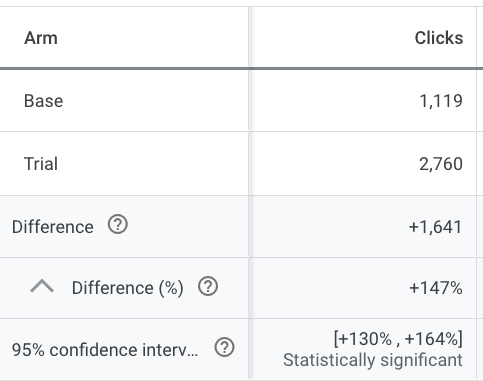

In this case, it shows that the number of Clicks went up by 147%.
Below that you can see “95% confidence interval”, +130%-164%, Statistically significant.
If you’re not familiar with statistics, this might seem very complicated.
What it is are the details about how Google tested if the 2 versions where really different, or if luck was involved.
In this case, it indicates that the variation really was different (= statistically significant) and not down to luck. So we can be fairly certain that we can get these results if we roll these changes out to the main campaign.
Biggest Mistakes with Google Ads Experiments
Before closing, I want to cover the biggest mistakes that i see people make when it comes to Google Ads experiments.
Mistake 1: Testing things that aren’t relevant (yet)
In the world of Google Ads Experiments, that means you can waste a lot of time testing meaningless things.
Every experiment has an opportunity cost, because it means waiting 2-4 weeks while the test is gathering data.
So you need to know that the tests you’re running are appropriate for the stage your campaigns are at.
If your campaign structure sucks and you have a ton of keywords in each ad group, it doesn’t matter which bidding strategy you use.
Mistake 2: Testings too small changes
This is similar to the mistake I just covered, but still slightly different.
When presented with the opportunity to make ANY change, advertisers will often pick a very narrow thing to test.
Like one headline in an ad that has 15 headline.
If you’re creating experiments, make sure you’re testing things that will move the needle. If not, you’ll end up with inconclusive results most of the time.
Mistake 3: Ending experiments too quickly
The last major mistake that I see is around stopping experiments early.
Some advertisers will set up a new experiment, let it run for 2 days, end it and set up a new one.
This is way too soon for Google Ads to adapt to any changes, especially if involves automation.
You need to at least get past the learning period in order to observe the actual performance of the change you’ve made.
As a rule of thumb, let experiments run for at least 2 weeks.
About Drafts & Experiments
Until late 2021, Google Ads Experiments worked slightly different. You first had to create a draft version of a campaign, which essentially was a copy of an existing campaign, with the changes you wanted to test.
Then you were able to create an Experiment based on that draft campaign.
While the experiments feature is still largely the same, the “draft” functionality is no longer necessary or available. That’s why you won’t see it in your account today.
Become a pro experimenter
By now you should have a good idea of what Google Ads Experiments can offer.
If this was new information to you, your first task is to head over to your Google Ads account and run ANY experiment.
If you have run experiments before, this article should help you to make your test more effective, so that you can get better learnings and quicker results!


